
Introduction
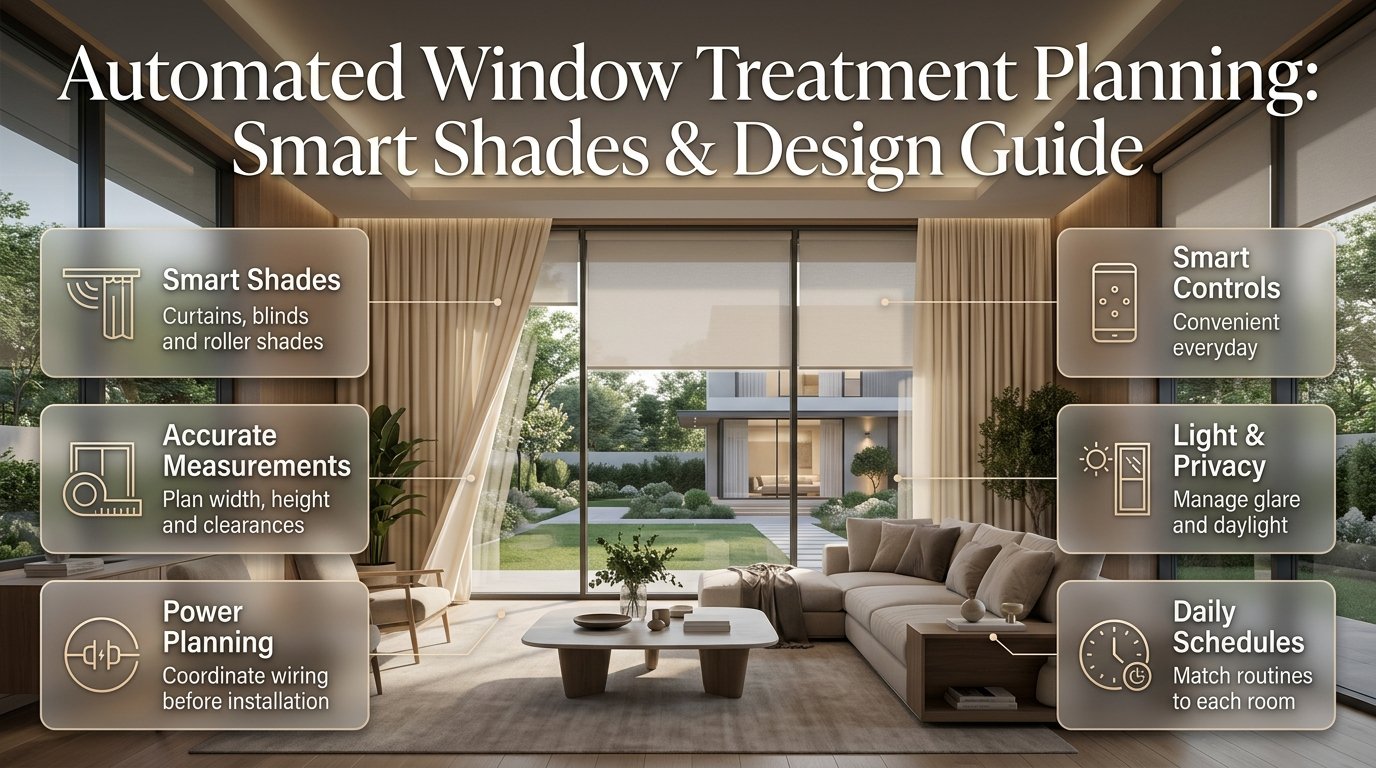
Automated Window Treatment Planning | Windows do more than bring natural light into a home. They affect privacy, comfort, room temperature, furniture placement, and the overall appearance of an interior. Yet many homeowners choose curtains or blinds only after the rest of the room is finished, which can lead to poor measurements, visible wiring, inconvenient controls, and expensive adjustments.
Automated window treatment planning helps you avoid these problems by bringing window coverings, motorization, lighting, interior design, and smart home technology together from the beginning. Instead of simply adding motors to ordinary curtains, you create a system that responds to your daily routine and makes each room easier to use.
Imagine waking up as your bedroom shades gradually open, reducing glare in your home office without interrupting your work, or closing the living room curtains with one command when the evening begins. These conveniences become much more practical when the system is designed around the actual needs of your household.
This guide explains how to select automated curtains, motorized blinds, and smart shades; measure windows accurately; plan electrical connections; choose controls; estimate costs; and avoid common installation mistakes. It also covers room-by-room recommendations, practical automation schedules, maintenance, and professional planning strategies.
For broader inspiration, explore DesignMode24 Interior Design to consider how window coverings can complement the rest of your home’s design.
What Is Automated Window Treatment Planning?
Automated window treatment planning is the process of designing motorized curtains, blinds, and shades around a home’s window dimensions, lighting requirements, privacy needs, electrical provisions, and preferred control system. It includes selecting suitable products, determining how they will be mounted, coordinating installation, and programming their movement.
The objective is to make window coverings convenient without allowing technology to dominate the interior.
A bedroom, for example, may require blackout shades that close at bedtime. A living room may benefit from light-filtering blinds that preserve daylight while reducing screen glare. A tall stairwell window might need a motorized covering simply because operating it manually is difficult.
Each situation requires a different solution.
Which decisions are included in the planning process?
A complete plan considers the following elements:
- Window assessment: Record dimensions, recess depth, frame condition, opening direction, and nearby obstructions.
- Treatment selection: Choose between roller shades, Roman shades, Venetian blinds, cellular shades, and motorized curtains.
- Fabric performance: Determine the appropriate light transmission, privacy, color, texture, and cleaning requirements.
- Motor selection: Match motor capacity to the treatment’s size, weight, and operating mechanism.
- Power arrangements: Decide between rechargeable batteries, replaceable batteries, plug-in power, or hardwired systems.
- Control methods: Choose remotes, wall switches, smartphone applications, schedules, or supported smart home integrations.
- Interior coordination: Ensure that the finished coverings complement the furniture, lighting, wall finishes, and architectural details.
- Maintenance access: Make sure motors, charging connections, and other serviceable components remain accessible.
The most reliable approach is to decide these details before ordering custom products. Once shades have been manufactured or ceilings have been finished, changing the mounting arrangement can become expensive.
Why Should You Plan Automated Window Treatments Before Installation?
Planning before installation helps prevent incompatible equipment, incorrect measurements, poor light control, and unnecessary electrical work. It also allows window coverings to be coordinated with the room’s architecture instead of treating them as an afterthought.
This is especially important during new construction or major renovation. Electrical contractors, interior designers, and window treatment installers can coordinate mounting pockets, wiring routes, switch positions, and finished ceiling details before these areas are concealed.
However, an existing home can also benefit from careful planning. Battery-powered motors and suitable retrofit systems can automate many windows without requiring extensive changes to walls or ceilings.
What problems can automated window coverings solve?
Automated coverings are useful when manual operation is inconvenient or when a room requires frequent changes in light and privacy.
Common examples include:
- High windows that are difficult to reach.
- Large curtains that are heavy to pull.
- Bedrooms that require reliable nighttime darkness.
- Living rooms affected by strong afternoon sunlight.
- Home offices where glare interferes with computer screens.
- Street-facing windows that need privacy in the evening.
- Multiple windows that should operate together.
Automation can also make it easier to manage solar heat gain. Closing a suitable shade before intense sunlight reaches a room may reduce unwanted heat, depending on the glazing, fabric, window orientation, and climate.
However, motorization itself does not guarantee lower energy bills. The result depends on the window treatment’s performance and how it is operated.
💡 Pro Tip: Identify the three windows that create the most inconvenience before planning your entire home. Automating those windows first can help you understand which features are genuinely useful before investing in a larger system.
Which Automated Window Treatment Should You Choose?
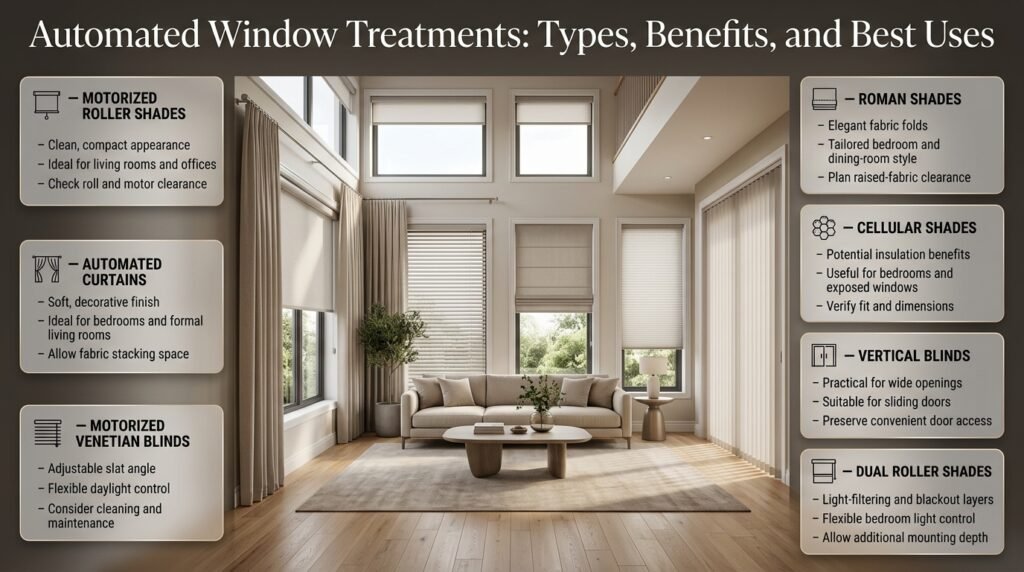
The best automated window treatment depends on the room’s purpose, the window’s dimensions, the amount of light you want to control, and your preferred interior style.
Roller shades suit minimalist rooms, motorized curtains add softness, Venetian blinds allow adjustable light control, and cellular shades can provide an insulating air layer. Roman shades offer a tailored fabric appearance but need additional space for their folds when raised.
| Treatment type | Main benefit | Best application | Planning consideration |
|---|---|---|---|
| Motorized roller shades | Clean, compact appearance | Living rooms and offices | Check roll and motor clearance |
| Automated curtains | Soft, decorative finish | Bedrooms and formal living rooms | Allow enough space for fabric stacking |
| Motorized Venetian blinds | Adjustable slat angle | Offices and living areas | Check cleaning and mechanical requirements |
| Motorized Roman shades | Elegant fabric folds | Bedrooms and dining rooms | Raised fabric needs stacking clearance |
| Cellular shades | Potential insulation benefits | Bedrooms and exposed windows | Verify dimensions and fit |
| Vertical blinds | Practical coverage for wide openings | Sliding doors and large windows | Plan movement around door access |
| Dual roller shades | Separate light-filtering and blackout layers | Bedrooms and multipurpose rooms | Requires additional mounting depth |
Are motorized roller shades suitable for modern homes?
Motorized roller shades are often suitable for contemporary interiors because they provide a simple profile and can be coordinated across several windows.
Available fabrics may include sheer, sunscreen, light-filtering, and blackout options. Each serves a different purpose.
A sunscreen fabric can reduce glare while preserving some outward visibility during daylight. A blackout fabric blocks much more incoming light, although light may still enter through the edges or gaps around the installation.
Before choosing a roller shade, confirm that:
- The motor housing fits the available space.
- The fabric provides the desired privacy.
- The mounting brackets clear window handles.
- The treatment meets the required width and height limits.
- The control system supports your preferred operating method.
When are automated curtains a better option?
Automated curtains work particularly well when the interior depends on fabric, softness, or layered window styling.
They can create a balanced appearance in bedrooms, living rooms, and rooms with floor-to-ceiling glazing. Depending on the design, curtains can also accommodate separate sheer and heavier fabric layers.
The main consideration is the amount of space required when the curtains are open. Heavy, lined curtains need suitable track support and a motor designed for their load.
If you want to combine sheers, decorative curtains, and other materials, layering textures without overcrowding offers useful ideas for maintaining visual balance.
Should you choose one treatment throughout the home?
Not necessarily. Consistency is valuable, but using the same treatment everywhere can create practical problems.
A bedroom may need blackout fabric, a kitchen may require a material suitable for its environment, and a living room may need adjustable daylight control.
Instead, create consistency through coordinated colors, similar hardware finishes, and compatible controls. The treatment itself should respond to the room’s requirements.
How Do You Assess and Measure Windows Correctly?
Accurate measurement is essential because motorized window coverings often require custom manufacturing. A small measurement error can affect mounting, fabric alignment, light gaps, and the clearance needed for the motor.
Begin by documenting each window separately. Even openings that appear identical may differ in recess depth, wall alignment, trim, or handle placement.
Step 1: Create a window inventory
Record the room name, window identification, width, height, mounting surface, and primary objective.
Include the following information:
- Window or door dimensions.
- Recess depth and available mounting area.
- Frame and wall materials.
- Handle, hinge, and lock locations.
- Nearby furniture and cabinetry.
- Sunlight exposure during the day.
- Available power connections.
- Desired privacy and light control.
- Accessibility for charging or maintenance.
A simple spreadsheet is sufficient for the first assessment.
| Room | Main challenge | Suggested starting point |
|---|---|---|
| Bedroom | Early morning sunlight | Blackout roller shade |
| Living room | Glare and changing daylight | Light-filtering motorized shade |
| Home office | Reflections on screens | Adjustable blind or sunscreen shade |
| Kitchen | Privacy and cleaning requirements | Suitable moisture-resistant covering |
| Stairwell | Difficult manual access | Motorized shade with remote control |
This inventory helps you compare priorities before requesting quotations.
Step 2: Measure the opening
For an inside mount, measure the recess width at the top, middle, and bottom. Record the height at the left, center, and right.
For example, a window might have these measurements:
| Measurement | Example |
|---|---|
| Top width | 149.5 cm |
| Middle width | 150.0 cm |
| Bottom width | 149.0 cm |
| Left height | 179.5 cm |
| Center height | 180.0 cm |
| Right height | 180.5 cm |
These figures illustrate how a recess can vary. They are not final ordering dimensions.
The manufacturer or installer must determine which measurements to use and whether any deductions are necessary. Different products have different measuring rules.
For an outside mount, measure the intended coverage area rather than simply copying the glass dimensions. Consider how much overlap is needed for privacy and light control.
⚠ Common Mistake: Never assume the narrowest or widest measurement can be submitted without checking the manufacturer’s instructions. The correct procedure depends on the selected mounting system.
Step 3: Check obstructions and clearances
Measurements must include more than the glass.
Window handles, locks, radiators, furniture, door tracks, ceiling details, and decorative trim can all interfere with movement.
For curtains, assess the available space for the track and the fabric stack when open. For roller shades, confirm that the roller and motor can fit without touching nearby surfaces.
For sliding doors, make sure the treatment does not obstruct the active panel or prevent normal entry and exit.
Step 4: Decide between inside and outside mounting
Inside mounting places the treatment within the window recess. It creates a neat, integrated appearance but depends on sufficient depth and reasonably suitable recess dimensions.
Outside mounting places the treatment above or around the opening. It can provide more coverage and may reduce light leakage around blackout shades.
Choose the mounting style according to the window, the desired appearance, and the manufacturer’s specifications.
⭐ Expert Tip: Finalize mounting decisions before ordering custom products. A shade that matches the glass dimensions may still fail to fit once the motor housing, brackets, and other hardware are included.
How Do You Select the Right Motor and Power Supply?
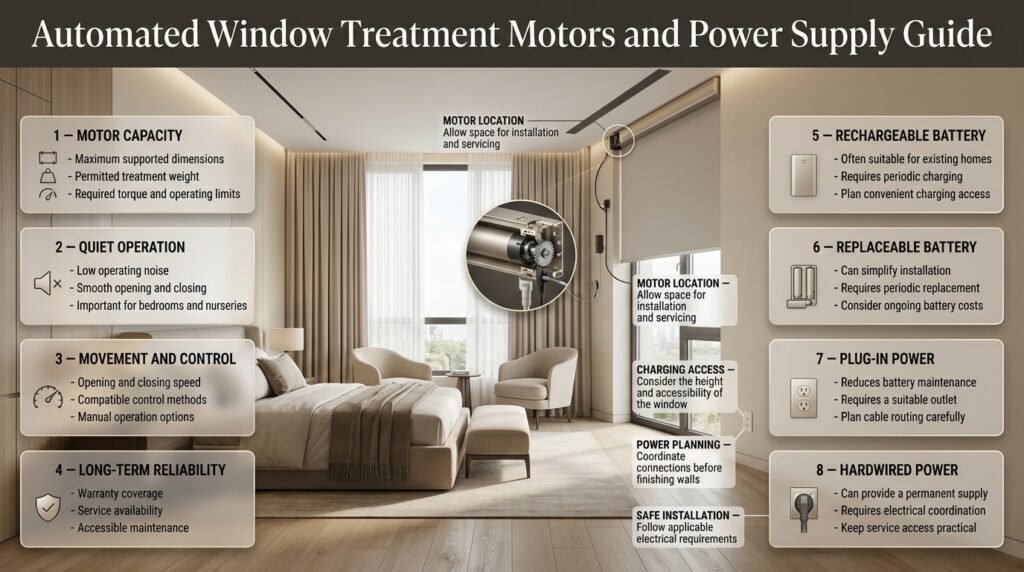
Motor selection should be based on the treatment’s dimensions, weight, operating mechanism, and expected use. Power planning should happen at the same time because a motor’s location affects wiring, charging access, and future maintenance.
A small roller shade and a wide, heavy curtain do not necessarily require the same motor. The supplier should confirm that the chosen motor supports the finished product.
What should you check before selecting a motor?
Review the following specifications:
- Maximum supported width and height.
- Permitted treatment weight.
- Required torque and operating limits.
- Noise level during movement.
- Opening and closing speed.
- Available control methods.
- Manual operation options.
- Warranty and service availability.
Quiet operation is particularly important in bedrooms and nurseries. Large treatments may require stronger motors or a different configuration to operate smoothly.
Avoid choosing a motor based only on price or appearance.
Which power option is best?
The main options include rechargeable batteries, replaceable batteries, plug-in power, and hardwired electrical connections.
| Power method | Advantages | Limitations |
|---|---|---|
| Rechargeable battery | Often practical for existing homes | Requires periodic charging |
| Replaceable battery | Can simplify installation | Creates recurring battery costs |
| Plug-in power | Reduces battery maintenance | Requires a suitable outlet and cable arrangement |
| Hardwired power | Can provide a permanent supply | Requires electrical coordination and suitable installation |
For an existing home, battery-powered systems can reduce disruption. However, a battery motor above a tall staircase may be difficult to reach when it needs charging.
During construction, hardwired or low-voltage solutions may be worth considering if the selected products support them and the wiring can be installed appropriately.
Electrical work must comply with applicable local requirements. Use a qualified professional where required, and ensure that connections remain accessible for inspection and servicing.
What should you consider when planning wiring?
Decide the intended treatment type, motor location, mounting method, and control system before electrical rough-in.
For a renovation, coordinate with the electrician and installer so that wiring emerges at the correct position. Also confirm whether a separate power supply, transformer, control cable, or hub connection is required.
Don’t assume that providing a wire above each window completes the plan. The exact connection point and power requirements depend on the chosen motor.
📌 Quick Tip: If you are uncertain which products you will eventually install, discuss future provision with the relevant professionals before walls and ceilings are closed. Any provision should follow the requirements of the intended system rather than relying on a generic wiring arrangement.
How Do You Choose a Smart Home Control System?
Smart home compatibility determines how your window treatments communicate with remotes, wall controls, apps, sensors, and other connected devices.
Some motors operate through proprietary radio controls. Others may use Wi-Fi, Bluetooth, Zigbee, Thread, or another supported technology. Certain systems require a dedicated hub or bridge to communicate with a smart home platform.
Before purchasing, confirm the exact model’s capabilities.
Which control method should you use?
Remote controls are useful when you want straightforward operation without opening an app.
Wall switches offer convenient control in frequently used rooms, especially when several coverings operate together.
Smartphone apps can provide individual control, grouping, scheduling, and status information where supported.
Voice controls may allow hands-free operation through a compatible smart home platform.
Automated schedules operate coverings at selected times or according to supported environmental triggers.
The most suitable arrangement is the one your household will use consistently.
How can you check compatibility?
Ask the supplier:
- Does the motor work with the intended control platform?
- Is a hub or bridge required?
- Can the treatment operate locally without internet access?
- Can several motors be grouped?
- Are schedules stored locally or in the cloud?
- Can the system be expanded later?
- What happens if the remote, hub, or network stops working?
Two products should not be assumed compatible simply because both are described as smart devices.
Should you automate every window together?
Grouping treatments can simplify daily operation, but grouping should reflect how rooms are used.
For example, bedroom shades may operate together in the morning, while a living room’s sunscreen shades should respond to sunlight independently.
Keep individual controls available even when you create groups. This gives you flexibility when someone wants privacy in one room without changing the entire home.
How Should You Plan Automated Window Treatments Room by Room?
Room-by-room planning prevents a common problem: choosing products that look consistent but fail to meet different functional needs.
Bedrooms prioritize darkness and quiet operation. Living rooms require adaptable daylight control. Offices need glare management, while kitchens and bathrooms may require materials suitable for their environments.
Bedroom window treatments
Bedrooms benefit from quiet motors, reliable privacy, and appropriate light blocking.
Blackout roller shades, lined automated curtains, and dual-layer systems are all potential choices. A dual-layer system can provide a light-filtering option during the day and a darker covering at night.
Useful features include:
- A bedside remote or accessible wall control.
- A morning opening schedule.
- An evening closing schedule.
- Quiet motor operation.
- Suitable edge coverage for reduced light leakage.
If the goal is a dark sleeping environment, examine the entire installation rather than focusing on the fabric label. Light can still enter around the sides or above the treatment.
Living room window treatments
Living rooms often need several different light settings throughout the day.
Sunscreen shades may reduce glare while retaining some outdoor visibility. Light-filtering shades can soften daylight, and decorative curtains can add texture and warmth.
Consider how the treatments look in both open and closed positions. Hardware, fabric stacks, and exposed roller tubes can affect the finished appearance.
Furniture placement also matters. A sofa, side table, or built-in unit should not interfere with curtain movement or access to controls.
For guidance on matching window coverings with furniture scale, explore understanding furniture proportions.
Home office window treatments
A home office should provide comfortable working light without excessive glare.
If sunlight falls directly on a monitor, adjustable blinds or sunscreen shades may help reduce reflections. The ideal fabric depends on the window’s orientation, the desk position, and the amount of daylight required.
Consider a schedule that adjusts the coverings during the hours when direct sunlight becomes uncomfortable. Where conditions change throughout the day, sensor-based control may provide additional flexibility.
Kitchen window treatments
Kitchen coverings should be selected with cleaning, moisture, and heat exposure in mind.
Choose materials and motors approved for the intended environment. Keep fabrics clear of cooking equipment, follow product safety instructions, and check that the covering can be cleaned without damaging the motor or fabric finish.
Automation can be useful when the window is above a sink or counter where manual controls are inconvenient.
Bathroom window treatments
Bathrooms require careful consideration of moisture and privacy.
Select products specifically suitable for the conditions in the room. Confirm that the installation complies with applicable electrical and product requirements.
Privacy must also be evaluated at night, when interior lighting can make some fabrics more transparent from outside.
Large windows and sliding doors
Large openings are strong candidates for automation because their coverings can be difficult to operate manually.
However, wider treatments may need stronger motors, more substantial brackets, or multiple independently operated units.
For sliding doors, check how the covering moves when the door is opened. Curtains need sufficient stack space, while shades must not interfere with handles or the movement of the door panels.
High windows and stairwell glazing
High windows present a special planning challenge because both operation and maintenance may require difficult access.
Motorized coverings with remote or scheduled control can solve the operating problem, but the power arrangement must also be practical.
A rechargeable motor is not necessarily the best option if reaching it requires specialist equipment every few months. Discuss permanent power, safe service access, and the manufacturer’s maintenance requirements before choosing the system.
How Can Automated Window Treatments Improve Light and Privacy?
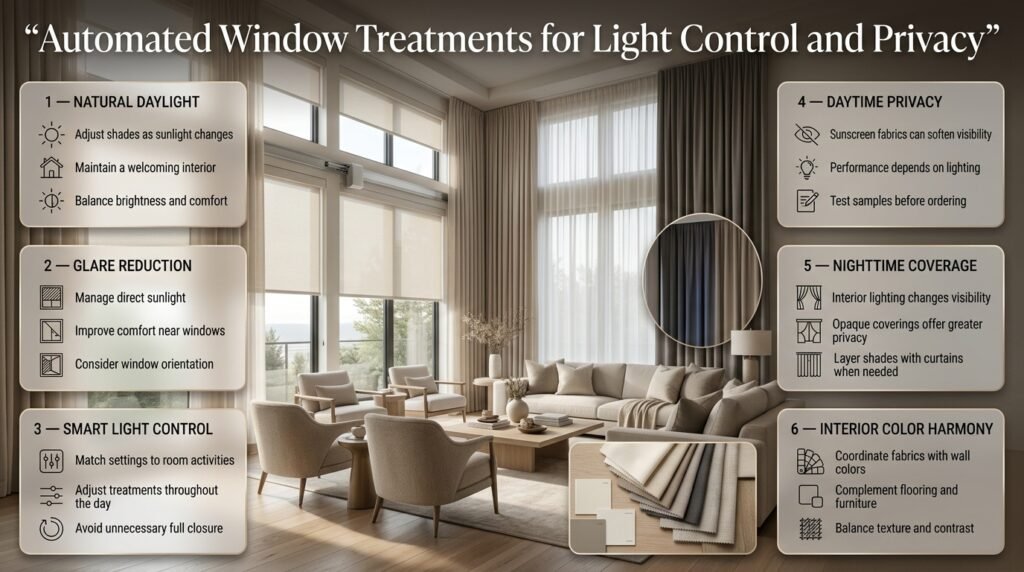
Automation makes it easier to adjust light and privacy consistently throughout the day. The greatest benefit comes from matching the treatment to the window’s exposure and the room’s activities.
Plan for daylight rather than simply blocking sunlight
Natural light can make a room feel brighter and more welcoming, but direct sunlight can cause glare, discomfort, and unwanted heat.
Consider how the sun moves across each room. East-facing windows may receive strong morning light, while west-facing windows can experience intense afternoon sunlight. The actual effect depends on surrounding buildings, shading, glazing, and seasonal changes.
Choose a treatment that manages the specific problem rather than automatically closing every shade whenever the sun appears.
Understand daytime and nighttime privacy
Some sunscreen fabrics allow people inside to see outdoors during the day while limiting visibility from outside under suitable lighting conditions.
However, this effect can reverse at night when interior lights are on. For dependable nighttime privacy, a more opaque covering or an additional curtain may be necessary.
If a room faces a neighboring property or a busy street, test fabric samples under realistic lighting conditions before ordering.
Coordinate window treatments with interior finishes
Window coverings occupy a large visual area, especially in rooms with wide glazing. Their color and texture can influence how the entire room feels.
Neutral fabrics can create a quiet backdrop, while textured curtains may add warmth to a restrained interior. Darker fabrics can create a stronger visual frame, although they may also change the room’s overall appearance.
When choosing a palette, consider the wall color, flooring, furniture, and existing decorative elements. The Paint Color collection can help you explore how colors work together in interior spaces.
How Should You Program Smart Window Treatment Schedules?
A useful automation schedule solves a repeated problem without creating unnecessary movement or complicated rules.
Start with simple routines based on household habits. Add sensor-based adjustments only when they improve comfort or convenience.
Create a morning routine
A morning routine might open bedroom shades gradually at a chosen time and raise selected living room coverings later.
This approach can help introduce daylight without opening every window treatment simultaneously.
Consider different schedules for weekdays and weekends if the household’s routine changes.
Create an afternoon glare routine
If strong afternoon sunlight regularly affects a living room or office, schedule the relevant shades to lower before glare becomes uncomfortable.
For rooms where sunlight varies considerably, a supported sunlight sensor may provide better results than a fixed time.
Test the automation on different days before relying on it. Brightness sensors measure light, not necessarily indoor temperature, so the trigger should reflect the actual purpose of the routine.
Create an evening privacy routine
An evening scene can close street-facing treatments at sunset or at a chosen time.
For privacy-sensitive rooms, use a reliable schedule and retain manual control for unexpected changes.
A schedule should also account for household members who may be working late or using different rooms at different times.
Coordinate with lighting and temperature
Some compatible smart home systems can coordinate window coverings with lighting or temperature-based rules.
For example, selected shades might close during strong summer sunlight while other coverings remain open to preserve daylight. In cooler weather, the system may allow useful sunshine to enter when appropriate.
These rules require careful testing because sunlight, temperature, and room use don’t always follow the same pattern.
Avoid conflicting automations
A common issue occurs when multiple schedules try to control the same treatment.
A morning routine might open a shade while a temperature-based rule tries to close it. Depending on the system, the result may be unpredictable or frustrating.
Keep a written record of the automation rules, identify which conditions take priority, and test the system after making changes.
How Much Does Automated Window Treatment Planning Cost?
The total cost depends on the number and dimensions of windows, the treatment type, fabric quality, motor specification, power arrangement, smart home accessories, installation complexity, and customization.
There is no universal price for a complete installation. A simple battery-operated roller shade can cost substantially less than a custom curtain system with concealed wiring and integrated controls.
Which factors affect the budget?
| Budget factor | Why it matters |
|---|---|
| Fabric and finish | Custom fabrics and premium materials can increase product costs |
| Window dimensions | Large openings may require stronger motors or multiple treatments |
| Motor specification | Quiet or specialized motors may affect pricing |
| Power arrangement | Wiring, transformers, and charging access influence installation |
| Smart home controls | Hubs, sensors, and additional controls may add expense |
| Mounting complexity | High windows and difficult surfaces may need specialist labor |
| Custom fabrication | Unusual shapes and special tracks can increase manufacturing costs |
| Ongoing maintenance | Batteries, replacement parts, and servicing affect long-term ownership |
How can you prepare a realistic budget?
Start by dividing the project into three groups.
Product costs: Include shades, curtains, motors, fabric, mounting hardware, and accessories.
Installation costs: Include measuring, mounting, electrical work, setup, and programming where applicable.
Long-term costs: Include battery replacement, charging requirements, repairs, and potential component replacement.
Ask for an itemized quotation rather than comparing the total price alone. Two quotations for the same number of windows may cover different fabrics, motor capacities, controls, and installation services.
How can you reduce costs without compromising quality?
Prioritize windows where automation offers a clear practical benefit.
You can also consider standard product configurations, coordinated fabrics, simpler control arrangements, and staged installation where future expansion is supported.
Avoid choosing a cheaper motor that cannot support the finished treatment. A poorly matched system may require replacement or cause operational problems later.
For broader renovation planning, the Home Improvement category offers ideas for coordinating upgrades with the rest of your property.
What Are the Most Common Automated Window Treatment Planning Mistakes?
Most problems arise when homeowners choose products before confirming measurements, technical compatibility, maintenance access, and room requirements.
Mistake 1: Ordering before confirming measurements
Why it happens: A window appears standard, so the homeowner assumes an off-the-shelf or custom product will fit.
Why it’s harmful: The motor housing may not fit the recess, or the shade may rub against the frame.
How to avoid it: Measure each opening and confirm the manufacturer’s final sizing rules before ordering.
Mistake 2: Choosing fabric based on appearance alone
Why it happens: Color and texture are easy to compare, while performance specifications receive less attention.
Why it’s harmful: The finished treatment may not provide the required privacy, light reduction, or glare control.
How to avoid it: Review fabric specifications and request samples. Test them during both daylight and nighttime conditions.
Mistake 3: Ignoring power access
Why it happens: Battery-powered motors appear to simplify installation.
Why it’s harmful: A high-mounted motor can become difficult to charge, creating a recurring maintenance problem.
How to avoid it: Evaluate charging and service access before finalizing the motor position.
Mistake 4: Assuming all smart devices are compatible
Why it happens: Similar product descriptions suggest that all systems work together.
Why it’s harmful: A motor may require a separate hub or may not support the intended automation features.
How to avoid it: Verify compatibility for the exact model and confirm any additional hardware requirements.
Mistake 5: Automating too many functions
Why it happens: Every available sensor and schedule seems useful during planning.
Why it’s harmful: Complicated rules can cause unexpected movement and make the system difficult to manage.
How to avoid it: Begin with a few dependable routines and add more only when they solve a real problem.
Mistake 6: Forgetting manual operation
Why it happens: The system is designed entirely around a smartphone app.
Why it’s harmful: A network, hub, or device problem may interrupt some functions, depending on the product.
How to avoid it: Confirm how local controls work and what remains available during a power or internet interruption.
Mistake 7: Ignoring furniture and room proportions
Why it happens: Window coverings are treated as a separate technical purchase.
Why it’s harmful: Curtains may collide with furniture, hardware may look oversized, or the finished room may feel unbalanced.
How to avoid it: Review the treatment alongside furniture dimensions, wall space, lighting, and circulation routes.
If you’re adding window treatments to a larger room redesign, gallery wall spacing formula can help you coordinate nearby wall decor without crowding the window area.
Mistake 8: Failing to plan for repairs
Why it happens: The initial design focuses on appearance and installation.
Why it’s harmful: A motor or power connection may become difficult to reach after the ceiling or trim is completed.
How to avoid it: Confirm service access, spare-part availability, and warranty support before approving the final design.
What Do Professionals Recommend for Reliable Results?
Professionals generally prioritize reliable operation, correct measurements, compatible equipment, and easy maintenance over the number of smart features a system offers.
A well-planned installation should be simple enough for every household member to operate confidently.
Prepare a window treatment schedule
Create one record for every opening with the following details:
- Room and window identification.
- Finished dimensions.
- Treatment type and fabric.
- Mounting arrangement.
- Motor model and power source.
- Control method.
- Intended automation routines.
- Installation and maintenance notes.
This record helps prevent confusion when several windows, products, and contractors are involved.
Coordinate the design with other renovation work
If the project includes new ceilings, electrical work, cabinetry, or wall finishes, coordinate window treatments before those elements are finalized.
Confirm recess dimensions, mounting pockets, power locations, switch positions, and access panels with the appropriate professionals.
Clear responsibilities are important too. Establish who will measure, supply, install, program, and maintain the system. For guidance on defining project expectations, see interior designer contract essentials.
Keep the design visually consistent
A coordinated home does not require identical coverings in every room. Instead, establish a consistent approach to colors, finishes, hardware, and control methods.
For example, several rooms might use similar neutral fabrics while the bedrooms receive blackout materials and the office uses a sunscreen fabric.
If you’re planning a calm, natural interior, Japandi furniture proportions can help you think about visual balance, material restraint, and the relationship between furnishings and architectural features.
Test everything before accepting the installation
The installer should demonstrate each motor, remote, wall control, and programmed routine.
Check that the coverings travel smoothly, stop at the intended limits, and clear nearby furniture. Verify that group controls operate the correct windows and that each device has a clear name.
Keep manuals, model numbers, warranty information, and programming instructions in one accessible place.
Make future changes easier
Households change over time. A bedroom may become a home office, furniture may move, and smart home preferences may evolve.
Ask whether the selected system supports regrouping motors, changing schedules, replacing individual components, and adding compatible treatments later.
For broader planning inspiration, DIY home projects can help you explore practical improvements while keeping more complex electrical and motorized installations within the appropriate professional scope.
How Do Automated Window Treatments Fit into the Overall Interior Design?
Window coverings should complement the architecture and furnishings rather than compete with them. Their scale, fabric, color, and movement can influence how spacious, bright, and balanced a room feels.
Coordinate window coverings with wall finishes
Light neutral shades can blend into a wall and create a quiet appearance. Contrasting curtains can frame the window and add visual depth.
The right choice depends on the room’s palette, natural light, furniture, and desired atmosphere.
If the wall color is already strong, a quieter fabric may help maintain balance. In a neutral room, textured curtains can add warmth without introducing too many competing colors.
Consider furniture placement and circulation
Window treatments should not interfere with doors, walkways, or everyday activities.
Curtain stacks can occupy more space than expected, particularly beside sliding doors or narrow passages. Roller shades may be better suited to openings where side clearance is limited.
When planning an entryway or compact room, consider how every element affects usable space. Entryway storage capacity planning provides a useful perspective on balancing storage, furniture, and circulation in constrained areas.
Use window treatments as part of a complete design plan
Automation works best when it supports the wider interior concept.
A minimalist room may benefit from discreet roller shades and concealed tracks. A traditional bedroom may suit decorative motorized curtains. A multipurpose living room may need layered coverings that adapt to different activities.
If you are planning several rooms together, the Interior Design section can help you explore complementary ideas for finishes, layouts, and room styling.
You can also browse find expert ideas for every room in your home when coordinating window treatments with a broader home improvement project.
How Do You Maintain Automated Window Treatments?
Automated window treatments need routine cleaning, occasional inspection, and power maintenance according to the manufacturer’s instructions.
The exact requirements depend on the fabric, motor, operating frequency, and environment.
A practical maintenance routine includes:
- Cleaning fabric using the approved method.
- Checking that shades and curtains move freely.
- Inspecting visible mounting hardware.
- Recharging batteries when required.
- Checking remotes and connections if operation becomes inconsistent.
- Keeping product manuals and warranty details accessible.
Avoid spraying cleaning products directly onto motors or electrical components. Don’t lubricate moving parts unless the manufacturer specifies an appropriate product and procedure.
If a shade becomes uneven or a motor repeatedly stops unexpectedly, investigate the problem instead of repeatedly forcing operation. Professional inspection may be necessary.
How Do You Plan Automated Window Treatments for an Entire Home?
Planning automated window treatments for an entire home starts with understanding how each room is used, how much natural light it receives, and what level of privacy is required. Rather than choosing the same motorized blinds or curtains for every window, assess each opening individually. Bedrooms may need blackout shades, living rooms may benefit from light-filtering treatments, and home offices often require effective glare control.
Once you understand these requirements, measure each window, select suitable coverings, and determine the appropriate motor, power supply, and control system. If you’re renovating or building a home, coordinate these decisions with electrical work and interior design before the walls or ceilings are finished.
Important planning considerations:
Create a window-by-window schedule with dimensions and functional requirements.
Choose fabrics according to light transmission, privacy, and maintenance needs.
Confirm motor capacity and mounting clearance before ordering.
Check smart home compatibility and decide whether individual or grouped controls are necessary.
Plan convenient access for battery charging, servicing, and future repairs.
A well-organized plan helps prevent installation problems and ensures the finished system works naturally with your household’s daily routine.
Which Automated Window Treatments Are Best for Different Rooms?
The best automated window treatment depends on the room’s purpose, window size, lighting conditions, and interior style. Motorized roller shades are popular for their clean appearance, while automated curtains add softness and work well in bedrooms and formal living spaces. Venetian blinds provide adjustable light control, and cellular shades may offer additional insulation when properly fitted.
For bedrooms, blackout shades or lined curtains can help create a darker sleeping environment. Living rooms often benefit from light-filtering or sunscreen fabrics that reduce glare while allowing some daylight to enter. In home offices, the priority is usually controlling reflections on computer screens without making the room unnecessarily dark.
How to choose the right option:
Bedrooms: Consider blackout fabrics, quiet motors, and convenient bedside controls.
Living rooms: Look for adjustable light control and fabrics that complement the furniture.
Home offices: Prioritize glare reduction and practical daytime visibility.
Kitchens and bathrooms: Select products specifically suitable for the moisture, cleaning, and safety requirements of the environment.
Large windows: Confirm motor capacity, mounting strength, and clearance around doors or furniture.
Before making a final decision, review fabric samples under different lighting conditions and check the manufacturer’s specifications. This helps ensure that the treatment performs as expected rather than simply matching the room’s appearance.
How Much Do Automated Window Treatments Cost, and What Affects the Price?
The cost of automated window treatments depends on the number of windows, their dimensions, the fabric or material selected, motor specifications, power arrangements, smart home accessories, and installation requirements. A simple battery-powered roller shade generally involves fewer installation requirements than a custom curtain system with concealed wiring, specialized tracks, and integrated controls.
The initial product price is only one part of the overall budget. Custom measurements, mounting hardware, electrical preparation, hubs, sensors, programming, and professional installation can all affect the final quotation. Larger or unusually positioned windows may also require specialized equipment or additional labor.
Factors to include in your budget:
Treatment materials, fabric quality, and custom finishes.
Motors, mounting brackets, remotes, and wall controls.
Battery systems, chargers, wiring, or compatible power supplies.
Smart home hubs and optional sensors.
Measuring, installation, and programming services.
Future battery replacement, maintenance, and repairs.
To control costs, prioritize windows where automation provides the greatest practical benefit. Request an itemized quotation and compare the complete installed price, warranty, and service support rather than selecting a system solely because its motor is inexpensive.
Can Automated Window Treatments Work With Existing Smart Home Systems?
Automated window treatments can work with compatible smart home systems, but compatibility depends on the specific motor, communication protocol, controller, and software platform. Some products support direct remote control, while others require a dedicated hub or bridge to enable app control, voice commands, or advanced automation.
Before purchasing, confirm that the exact motor model supports your preferred smart home platform. Similar product descriptions do not necessarily mean that two devices can communicate with each other. You should also understand which functions remain available if the internet connection, hub, or smartphone becomes unavailable.
What to check before installation:
Whether the motor supports your preferred smart home platform.
Whether a separate hub or bridge is required.
Whether schedules can operate locally without an internet connection.
Whether several treatments can be grouped while retaining individual control.
Whether compatible sensors can trigger movement based on sunlight or temperature.
Whether the system supports future expansion and replacement components.
For example, a homeowner might program bedroom shades to open in the morning and living room coverings to close during strong afternoon sunlight. These routines are practical when the products support the required scheduling or sensor features. Start with a few simple automations, test them carefully, and add more only when they improve everyday comfort.
What Are the Most Common Mistakes to Avoid When Installing Automated Window Treatments?
The most common mistakes include incorrect measurements, choosing unsuitable fabrics, overlooking motor capacity, ignoring power access, and assuming that all smart devices are compatible. These problems often occur when homeowners select products before assessing the window, the room’s requirements, and the technical limitations of the installation.
For example, a blackout shade may still allow light around its edges if the mounting arrangement does not provide sufficient coverage. Similarly, a rechargeable motor positioned above a difficult-to-reach window can become inconvenient to maintain. A treatment may also look attractive but fail to operate properly if the motor is not designed for its size or weight.
Common mistakes and how to prevent them:
Measuring only once: Follow the manufacturer’s measurement instructions and check for uneven recesses.
Ignoring fabric performance: Evaluate privacy, light transmission, and cleaning requirements before ordering.
Choosing an unsuitable motor: Confirm the permitted treatment dimensions and weight.
Forgetting maintenance access: Plan how batteries, motors, and other serviceable components will be reached.
Overlooking compatibility: Verify the exact motor, hub, and control requirements.
Creating complicated schedules: Start with simple routines and avoid conflicting automation rules.
Skipping final testing: Check movement, travel limits, remotes, grouped controls, and programmed schedules before accepting the installation.
A successful installation depends on more than choosing a motorized product. Accurate planning, suitable materials, compatible controls, and accessible maintenance arrangements help create a system that remains convenient and reliable over time.
Conclusion
Automated window treatment planning is about more than choosing smart blinds or motorized curtains. It involves understanding each room’s lighting requirements, privacy needs, window dimensions, interior style, and everyday routines before selecting the right automation system. A well-planned setup can make a home more comfortable, improve light control, support energy efficiency, and simplify daily living without compromising its visual appeal.
The best results come from balancing technology with practical interior design. Bedrooms may benefit from blackout treatments and quiet motors, living rooms often need flexible daylight control, and kitchens require materials that are easy to maintain. Before purchasing equipment, confirm motor compatibility, power requirements, smart home integration, and installation measurements. Planning these details early can help prevent unnecessary expenses and frustrating upgrades later.
For homeowners exploring connected living and thoughtful interiors, automated window treatments can become a natural part of a cohesive home design. Explore more practical inspiration at DesignMode24 Interior Design and choose solutions that complement your space, lifestyle, and long-term needs.
Ultimately, successful automation does not mean adding the most technology possible. It means selecting reliable, easy-to-use features that solve real problems. With careful planning, the right window treatments can combine convenience, privacy, light management, and timeless style in a way that makes every room work better.