

Introduction
Wardrobe Hanging Rail Height | A wardrobe can have beautiful doors, stylish finishes, and plenty of storage space, yet still feel inconvenient when the hanging rail is installed at the wrong height. Shirts may brush against drawers, long dresses may drag on the bottom panel, and an upper rail may be so high that everyday clothes become difficult to reach. These problems are often caused by poor planning rather than a lack of wardrobe space.
Choosing the correct wardrobe hanging rail height helps you organize clothing efficiently, use vertical space properly, and make everyday dressing easier. However, there is no single measurement that works for every wardrobe. The right position depends on the length of your clothes, the wardrobe’s internal height, the available hanging space, and the people who will use it.
This guide explains standard wardrobe rail heights, double-hanging arrangements, clearance requirements, suitable positions for long garments, and practical installation methods. You’ll also learn how to avoid common measuring mistakes and make a small wardrobe more useful without overcrowding it.
Whether you’re planning a fitted wardrobe, updating an existing cupboard, or building a DIY storage system, the goal is the same: create a wardrobe that looks organized, holds your clothes properly, and works comfortably every day.
For more practical ideas about home organization and room planning, visit DesignMode24 Interior Design.
1. What Is the Standard Wardrobe Hanging Rail Height?
The standard wardrobe hanging rail height is generally around 40–42 inches (102–107 cm) from the finished floor for shirts, blouses, and other short garments. A double-hanging wardrobe may have an upper rail around 78–84 inches (198–213 cm), while long dresses and coats often require a separate section with approximately 55–65 inches (140–165 cm) of clear hanging space.
These figures are practical starting points, not fixed building requirements. The correct measurement depends on the wardrobe’s design and the clothing you intend to store.
Recommended wardrobe rail heights
| Clothing or storage type | Suggested rail height from floor |
|---|---|
| Shirts and blouses | 38–42 inches (97–107 cm) |
| Short jackets | 40–44 inches (102–112 cm) |
| Trousers folded over hangers | 38–42 inches (97–107 cm) |
| Skirts and shorter garments | 40–44 inches (102–112 cm) |
| Lower rail in a double-hanging wardrobe | 38–42 inches (97–107 cm) |
| Upper rail in a double-hanging wardrobe | 78–84 inches (198–213 cm) |
| Long dresses | Often 60–66 inches (152–168 cm) |
| Long coats | Often 62–68 inches (157–173 cm) |
The measurements for long garments describe possible rail positions, but the garment’s actual length must determine the final position. A long evening dress may need considerably more clearance than a knee-length dress.
Why do standard measurements vary?
Wardrobes differ in height, depth, construction, and intended use. A rail that works well for an adult’s everyday shirts might be unsuitable for a child’s clothing or a wardrobe containing mostly formal dresses.
Three factors matter most:
- Garment length: Longer clothes require more uninterrupted space beneath the rail.
- User accessibility: A rail must be positioned at a comfortable height for the person using it.
- Wardrobe construction: Shelves, drawers, raised bases, and top panels affect the available space.
Professional tip: Use standard measurements to begin planning, then adjust them to suit your own clothes and wardrobe dimensions.
2. How High Should a Wardrobe Rail Be for Different Types of Clothes?
Different garments need different amounts of vertical space. Measuring clothing before installing the rail helps you avoid wasted space and prevents hems from touching the shelf or floor.
Shirts, blouses, and everyday tops
A rail around 38–42 inches above the floor is a useful starting point for many shirts and blouses. These garments generally need less hanging space than long coats or dresses, making them suitable for compact wardrobes and double-hanging systems.
However, don’t measure only the shirt itself. The hanger hook and the way the garment sits on the hanger also affect the total length.
If the shirt measures 28 inches from the hanger hook to its hem, it needs at least that much unobstructed space below the rail. Additional clearance helps prevent the fabric from resting against a shelf or becoming trapped behind drawers.
For a wardrobe used mainly for office shirts and casual tops, a dedicated short-hanging section can provide practical everyday storage without wasting the full height of the wardrobe.
Trousers and jeans
Trousers can be stored on ordinary hangers, clip hangers, trouser bars, or pull-out racks. The storage method determines how much clearance is required.
- Folded trousers: Folding them over a hanger usually reduces their hanging length.
- Full-length trousers: Hanging them by the waistband may require approximately 38–44 inches of clearance, depending on their length.
- Pull-out trouser racks: These may require less conventional hanging height, but the mechanism needs sufficient space to extend.
If trousers share a rail with shirts, measure the longest garment in the group. Full-length trousers can require more room than short shirts, particularly when they hang straight from the waistband.
Short jackets and blazers
Short jackets and blazers can usually fit into a conventional short-hanging section. A rail around 40–44 inches high may work, provided the wardrobe has enough clear space underneath.
Structured jackets may also need additional width because their shoulders extend beyond those of ordinary shirts. If the wardrobe is narrow, overcrowding can crush the shoulders and make clothes difficult to remove.
Choose hangers that support the shape of the garment and leave enough space for jackets to hang naturally.
Dresses and long skirts
Long dresses require more planning because their lengths vary considerably. Knee-length dresses may fit in a standard short-hanging section, while maxi dresses and formal gowns need a longer uninterrupted drop.
A rail positioned around 60–66 inches above the floor may suit many dresses, but some full-length garments require additional clearance.
Measure the dress from the hanger hook to the lowest point of the hem. If the wardrobe has drawers or shelves beneath the rail, measure from the top of that obstruction rather than assuming the full wardrobe height is available.
For a mixed wardrobe, consider allocating one section specifically to long clothing instead of raising every rail to accommodate the longest dress.
Long coats and winter outerwear
Long coats often need a rail around 62–68 inches above the floor, depending on their length. Heavy winter coats also need sufficient width and a sturdy rail system.
A coat should hang freely without touching shoes, boxes, or the wardrobe floor. Contact with stored items can crush the hem, collect dust, or make the coat difficult to remove.
Check the rail’s load capacity as well. A rail that comfortably supports lightweight shirts may not be suitable for a large collection of heavy winter coats without appropriate brackets and fixings.
Children’s clothing
Children’s wardrobes should support independence and safe access. A lower rail allows children to choose and put away their clothes without stretching or climbing.
The best height depends on the child’s age, reach, and clothing length. An adjustable rail is particularly useful because the wardrobe can be adapted as the child grows.
Keep heavy items on lower shelves and secure tall freestanding wardrobes to the wall according to the manufacturer’s instructions.
3. How Much Vertical Clearance Does a Wardrobe Hanging Rail Need?
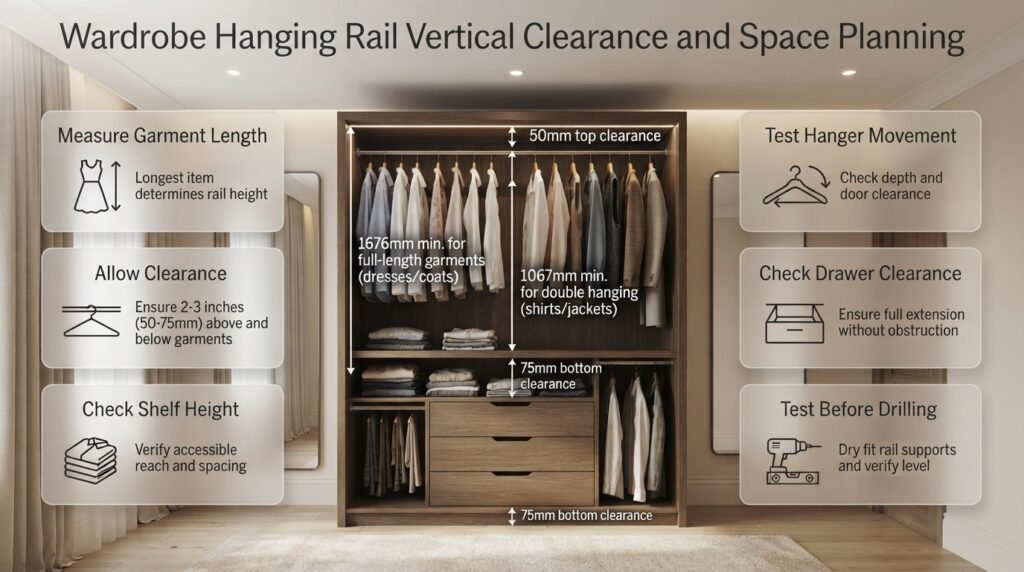
Vertical clearance is the unobstructed space between the rail and whatever sits below it, such as the floor, a shelf, or a drawer unit. A rail can be positioned at the correct height and still be inconvenient if clothes touch the surface beneath them.
To calculate the required clearance, hang the garment on the intended hanger and measure from the top of the hook to the garment’s lowest point. Add a practical allowance for free hanging, then check the available space below the proposed rail.
A practical measuring example
Suppose a shirt measures 29 inches from the top of its hanger hook to the hem. You want approximately 3 inches of clearance beneath it.
The calculation is:
29 inches of garment length + 3 inches of clearance = 32 inches of required space below the rail.
If a shelf sits 9 inches above the wardrobe floor, the rail would need to be approximately 41 inches above the floor to provide that clearance.
This example assumes the shelf’s upper surface is the relevant obstruction and the measurements are taken from consistent reference points.
Allow space for hanger movement
Clothes need room not only to hang but also to be removed. A rail positioned directly beneath a top panel may leave insufficient space to lift the hanger hook over the rail.
This problem is common in wardrobes where the top shelf has been installed without considering how the rail will be used.
Before fixing the rail, test the movement with an actual hanger. If you cannot remove it comfortably, reposition the rail or revise the shelf arrangement.
Consider drawers and shelves below the rail
Drawers can reduce the available hanging space, particularly when their handles project forward. Shelves may create similar problems if the garments hang too close to the surface.
Check the following before installation:
- The height of the drawer unit or shelf.
- The drawer’s opening movement.
- The length of the longest garment.
- The space needed to remove hangers.
- The distance between the rail and the upper panel.
💡 Pro tip: Mark the planned rail position with masking tape and hold a real garment against it. This simple test often reveals clearance problems before you drill any holes.
4. What Is the Best Height for Double Wardrobe Hanging Rails?
Double hanging rails allow two rows of short garments to fit within the height normally used for one long-hanging section. They’re particularly useful for shirts, blouses, short jackets, and trousers folded over hangers.
A common starting arrangement places the lower rail around 38–42 inches from the floor and the upper rail around 78–84 inches from the floor. However, the distance between the rails must accommodate the garments hanging from the upper rail and leave sufficient room for the lower section.
How should you arrange two rails?
Start by measuring the wardrobe’s internal height. Then identify the longest garment that will hang from each rail.
If the upper rail is too low, garments may overlap the lower rail or the clothes beneath it. If the upper rail is too high, it may become uncomfortable to reach.
The lower rail should also leave enough clearance for its own clothing. Avoid positioning it so close to the floor that garments brush against shoes or stored boxes.
Is double hanging suitable for every wardrobe?
No. Double hanging is most useful when most of your clothing is relatively short.
It may be unsuitable when the wardrobe mainly stores full-length dresses, long coats, or other garments requiring a substantial uninterrupted drop. In those cases, a combination of short-hanging and long-hanging sections is usually more practical.
How do you make a double-hanging wardrobe easier to use?
- Keep frequently worn garments in the more accessible section.
- Reserve the upper rail for clothing you can reach comfortably.
- Use consistent hanger styles to reduce wasted space.
- Avoid filling both rails so tightly that clothes become difficult to remove.
- Check the rail manufacturer’s load limits before hanging heavy garments.
Common mistake: Installing the upper rail at the highest possible position without testing whether the intended user can reach it comfortably.
5. How Do You Calculate the Correct Wardrobe Hanging Rail Height?
The most reliable method is to measure the clothing, identify the lower obstruction, and calculate the rail position using the available clearance.
Rail height above the floor = height of the lower obstruction above the floor + required clearance between the rail and that obstruction.
The required clearance includes the garment’s hanging length and any additional space you want beneath it.
Step 1: Measure the internal wardrobe height
Measure from the wardrobe’s internal base to the underside of its top panel or ceiling.
Do not automatically use the external wardrobe height. A raised base, top trim, or internal shelf may reduce the usable space.
Record the internal width and depth as well, because these dimensions affect the type of rail and the arrangement of other storage components.
Step 2: Measure your longest garments
Choose the longest shirt, jacket, dress, or coat that will occupy the section.
Place it on the hanger you intend to use and measure from the top of the hook to the lowest point of the garment.
Measuring the actual clothes is more reliable than relying entirely on general recommendations.
Step 3: Identify the lower obstruction
Determine whether the garment will hang above the floor, a shelf, a drawer unit, or a shoe-storage area.
Measure the height of that surface from the floor. This becomes the lower reference point for calculating the rail position.
Step 4: Add the required clearance
Suppose your longest garment and hanger measure 35 inches, and you want 3 inches of clearance beneath the garment.
You need approximately 38 inches between the rail and the lower obstruction.
If the shelf beneath the rail is 10 inches above the floor, the rail would need to sit around 48 inches above the floor.
This is a planning example. Check that the proposed rail also leaves sufficient space above the garment and can be reached comfortably.
Step 5: Test the position before drilling
Use masking tape or a removable mark to indicate the proposed height. Hold the hanger in place and check the clearance above and below it.
Test the position with the longest garment and a typical everyday item. This helps confirm that the section will work in practice rather than simply fitting on paper.
Step 6: Install the rail securely
Follow the manufacturer’s installation instructions and use brackets appropriate for the rail and wardrobe material.
Once installed, test the rail with several garments. Check for movement, sagging, loose fixings, and interference with doors or drawers before loading it fully.
For more home improvement guidance, explore DIY home projects.
6. How Deep Should a Wardrobe Be for Hanging Clothes?

Wardrobe depth affects whether clothes hang freely or become pressed against the doors or back panel. A conventional wardrobe around 22–24 inches (56–61 cm) deep is a useful starting point for many standard hanger arrangements, although the required usable depth varies by design.
Shallow wardrobes may need a pull-out rail or a front-to-back hanging system. These arrangements can save space, but they may hold fewer garments and require different hardware.
What affects wardrobe hanging depth?
Hanger width and shape: Broad wooden hangers and coat hangers may need more room than slim hangers.
Door design: Hinged doors, sliding doors, and internal tracks can reduce the usable space available for clothing.
Garment bulk: Winter coats, padded jackets, and structured clothing need more space than lightweight shirts.
Rail orientation: A conventional side-to-side rail requires different depth arrangements from a front-to-back rail.
What if your wardrobe is shallow?
Avoid forcing a conventional rail into a space that causes clothing to press against the doors. Instead, consider a suitable pull-out rail or a storage system designed specifically for shallow wardrobes.
Check the manufacturer’s measurements carefully, including the space required for brackets and moving parts.
If you’re planning compact storage, foldaway furniture for sleeping spaces offers related ideas for making limited room more functional.
7. What Is the Best Wardrobe Rail Height for Small Bedrooms?
In a small bedroom, the best rail arrangement uses vertical space efficiently without making everyday clothing difficult to reach. Double hanging can increase storage capacity, while a separate long-hanging section keeps dresses and coats from becoming cramped.
Start by dividing your clothes into three groups:
- Short garments, including shirts and blouses.
- Medium-length garments, including jackets and some skirts.
- Long garments, including coats and dresses.
Assign space according to what you own rather than dividing the wardrobe into equal sections.
Use the full height without wasting space
Tall wardrobes can provide valuable overhead storage for seasonal clothing, spare bedding, and bags. However, shelves placed too high may be inconvenient for items you use daily.
Keep everyday items within comfortable reach and reserve the highest shelves for belongings you need less often.
Combine hanging space with shelves
Not every garment needs to hang. Knitwear, T-shirts, casual trousers, and accessories may be better stored in drawers or on shelves.
This can reduce the amount of rail space required and leave more room for long garments.
If you’re redesigning a compact bedroom, explore interior design for broader room-planning ideas.
Plan storage around the room
The wardrobe should work with the room’s doors, bed, and walking routes. A well-organized wardrobe is less useful if its doors block circulation or make the bedroom feel crowded.
Consider where the wardrobe will stand, how its doors will open, and whether drawers can be accessed without moving furniture.
For more practical organization ideas, see entryway storage capacity planning. Although entryway storage serves a different purpose, the same principle applies: plan the usable space around the items that need to fit.
8. How Should You Position Wardrobe Rails Above Drawers and Shelves?
Rails above drawers and shelves require careful planning because these components compete for the same vertical space.
A rail may appear correctly positioned when the wardrobe is empty, but long garments can overlap the drawer unit or rest against stored items once the wardrobe is in use.
Measure from the top of the obstruction
If a rail sits above a drawer unit, measure the usable clearance from the top of the drawer unit to the rail.
For example, if a garment needs 34 inches of hanging clearance and the drawer unit is 12 inches above the floor, the rail may need to be around 46 inches above the floor.
The exact position depends on the garment length and the clearance allowance.
Consider the way drawers open
Check whether garments hanging above the drawers will obstruct handles or become trapped when the drawers are opened.
If necessary, reduce the hanging width, move the drawers, or allocate that section to shorter clothing.
Make shelves work with the rail
A top shelf can be useful for folded clothes and accessories, but it should not prevent you from lifting hangers onto the rail.
Plan the shelf and rail together rather than installing each component independently.
For ideas on organizing display and storage surfaces, read styling open shelves without clutter.
9. Should You Choose a Fixed or Adjustable Wardrobe Hanging Rail?

An adjustable rail is useful when your storage needs may change. It lets you reposition the rail for different garment lengths, growing children, or a wardrobe that needs to change from single hanging to double hanging.
A fixed rail can be suitable when the wardrobe’s purpose is clear and the storage arrangement is unlikely to change.
| Feature | Fixed rail | Adjustable rail |
|---|---|---|
| Layout flexibility | Limited | Higher |
| Initial installation | Often straightforward | Depends on the system |
| Future repositioning | May require new holes | Often easier |
| Cost | May be lower | May be higher |
| Best use | Stable storage requirements | Changing storage requirements |
When is a fixed rail the better choice?
A fixed rail can work well in a custom wardrobe designed around specific clothing categories. It may also suit a simple cupboard where the available space and garment lengths are unlikely to change.
The key is to plan the position carefully before installation.
When is an adjustable system worth considering?
An adjustable rail may be worth the extra cost if you share the wardrobe, expect your clothing requirements to change, or want to adapt the layout in the future.
Before buying, check the adjustment range, load rating, bracket compatibility, and fixing requirements.
For related storage and home improvement ideas, visit the Home Improvement category.
10. How Do You Choose the Right Wardrobe Rail Material and Support?
The rail’s height determines how clothing fits, but the material and fixing system determine whether the rail can support the expected load.
Metal and wooden rails can both work well when they are properly specified and installed. The right choice depends on the wardrobe design, the rail’s rated capacity, the distance between supports, and the weight of the clothing.
Metal wardrobe rails
Metal rails often provide a slim profile and can be suitable for modern fitted wardrobes. However, strength varies according to the material, diameter, thickness, and support arrangement.
Don’t assume that every metal rail can carry the same weight.
Wooden wardrobe rails
Wooden rails can suit traditional interiors and custom-built wardrobes. Their performance depends on the timber, dimensions, span, and support system.
Check for sagging over long spans, especially when the wardrobe holds heavy coats.
Choose suitable brackets and fixings
Use brackets recommended for the rail and fix them to appropriate structural material. Thin panels or unsuitable screws may not provide sufficient support.
Follow the manufacturer’s guidance for bracket spacing and maximum load. If the wardrobe panels are weak or damaged, repair or reinforce them before installing a heavily loaded rail.
For additional guidance on planning loads and storage structures, read floating shelf load capacity planning.
11. What Are the Most Common Wardrobe Rail Installation Mistakes?
Small measurement errors can make a wardrobe inconvenient for years. Most problems can be avoided by planning the entire interior and testing the rail position before drilling.
Mistake 1: Using the same height for every garment
Why it happens: Standard measurements seem easier than measuring individual clothes.
Why it’s harmful: Long dresses may touch the floor, while short shirts may waste valuable vertical space.
How to avoid it: Measure the longest garment in each category and create separate short- and long-hanging sections where necessary.
Mistake 2: Measuring from the wrong surface
Why it happens: The installer measures from the room floor even when the wardrobe has a raised base.
Why it’s harmful: The rail ends up at an unexpected position relative to the wardrobe interior.
How to avoid it: Establish a consistent reference point and account for any raised base or internal platform.
Mistake 3: Forgetting drawer clearance
Why it happens: The plan focuses on the rail rather than the entire wardrobe.
Why it’s harmful: Garments may overlap drawers, catch on handles, or become difficult to remove.
How to avoid it: Mark the drawer unit, shelf positions, and hanging lengths on a simple drawing before installation.
Mistake 4: Installing the rail too high
Why it happens: Maximum storage capacity takes priority over comfortable access.
Why it’s harmful: Everyday clothing becomes difficult to reach.
How to avoid it: Test the position from a normal standing position and prioritize accessibility for the intended user.
Mistake 5: Ignoring rail strength
Why it happens: The installer assumes that a metal rail can support any quantity of clothing.
Why it’s harmful: Heavy garments can cause sagging, loose brackets, or damage to the wardrobe.
How to avoid it: Follow the manufacturer’s load limits and use suitable brackets and fixings.
Mistake 6: Drilling before checking the layout
Why it happens: Measurements are taken without considering the wardrobe’s panels, doors, or other fittings.
Why it’s harmful: Screws may interfere with components or fail to hold securely.
How to avoid it: Check the construction, fixing requirements, and clearances before drilling.
Mistake 7: Overcrowding the rail
Why it happens: The wardrobe is designed to hold the maximum possible number of garments.
Why it’s harmful: Clothes become difficult to see and remove, and heavier sections may place excess load on the rail.
How to avoid it: Leave enough room for hangers to move freely and store suitable items in drawers or on shelves instead.
Mistake 8: Forgetting future needs
Why it happens: The wardrobe is planned around the current clothing collection alone.
Why it’s harmful: New coats, dresses, or storage requirements may make the layout inconvenient.
How to avoid it: Consider adjustable hardware or leave a flexible section for changing needs.
12. What Professional Tips Help Create a Better Wardrobe Layout?
A practical wardrobe layout begins with the people who use it and the clothes they need to store. Measurements should guide the design, but comfort, accessibility, and structural safety are equally important.
Measure the longest garment in every category
Don’t assume all shirts, jackets, or dresses have similar lengths. Measure the longest item that will occupy each section and use that measurement to establish the minimum clearance.
This reduces the risk of clothes touching the shelf or floor.
Prioritize everyday accessibility
Frequently used garments should be placed where they can be reached easily. If a wardrobe is shared, consider each user’s height and the clothing they use most often.
For children and anyone with limited reach, avoid placing essential everyday items too high.
Plan the complete interior before installation
Decide where the rails, drawers, shelves, and shoe storage will go before drilling any holes.
A simple drawing can help identify conflicts between components and make it easier to calculate the usable hanging space.
Test with actual clothes
Before finalizing the installation, test the arrangement using a typical shirt, the longest dress, and the bulkiest coat.
This reveals problems that may not be obvious from measurements alone.
Keep heavy clothing properly supported
Heavy coats can put substantial weight on the rail and brackets. Check the rated capacity and use suitable fixings.
If the rail begins to sag or the brackets loosen, remove some weight and inspect the installation before continuing to use it.
Use finishes and colors thoughtfully
A well-organized wardrobe should also complement the bedroom. Light finishes may help a compact interior feel brighter, while consistent hangers and simple storage containers can create a more orderly appearance.
For guidance on coordinating finishes, explore Paint Color and low VOC interior finishes.
Keep the surrounding layout practical
The wardrobe should not obstruct the bedroom’s walking routes or interfere with doors, windows, or nearby furniture.
When planning the whole room, consider how furniture placement affects circulation and everyday use. Related guidance on fireplace furniture clearance and designing around structural walls can help you think about clearances and fixed architectural features as part of a larger layout.
13. How Can You Make Wardrobe Storage More Efficient Without Adding Another Rail?
Adding another rail isn’t always the best solution. In some wardrobes, a better arrangement of shelves, drawers, and hanging sections can create more useful storage without overcrowding the interior.
Store suitable clothing on shelves
T-shirts, knitwear, casual trousers, and some accessories can be folded rather than hung. This frees rail space for garments that benefit from hanging.
Avoid stacking delicate or easily creased garments too high, where removing one item may disturb the entire pile.
Use the top shelf for less frequently used items
Seasonal clothing, spare bedding, and occasional accessories can often be stored on a higher shelf.
Keep everyday items at accessible heights and avoid placing heavy objects where retrieving them could be unsafe.
Organize clothing by length
Grouping garments by length makes it easier to decide where the rails should go. It also helps identify opportunities to use the lower space beneath shorter garments for shoes, drawers, or boxes.
Make sure any lower storage doesn’t interfere with the garments hanging above it.
Avoid filling every available inch
A wardrobe that is packed to capacity may technically hold more items, but it can be frustrating to use.
Leave enough space to remove hangers, inspect clothing, and return garments without pulling several other items out of the way.
For related organization ideas, see bathroom linen closet planning. Although linen closets store different items, the same principle applies: organize storage according to item size, frequency of use, and available space.
14. What Should You Check Before Installing a Wardrobe Hanging Rail?
Before installation, review the measurements, storage plan, hardware, and accessibility of the proposed arrangement.
Use this checklist to catch problems before they become expensive or difficult to correct.
- Measure the wardrobe’s internal height, width, and depth.
- Measure the longest garment assigned to each hanging section.
- Choose the correct rail height for the intended clothing.
- Calculate the clearance above shelves, drawers, and the floor.
- Check that hangers can be lifted onto and removed from the rail.
- Confirm that doors and drawers open without obstruction.
- Check the rail’s rated capacity and the manufacturer’s installation instructions.
- Select suitable brackets and fixings for the wardrobe material.
- Test the proposed position before drilling.
- Consider whether an adjustable system would be useful in the future.
Taking these steps before installation helps prevent poor spacing, inconvenient access, and unnecessary alterations.
For more ideas on making practical improvements around the home, explore dining room circulation clearance. The same planning principle applies across rooms: usable space depends on movement and clearance, not simply on fitting more furniture or storage into an area.
What is the standard wardrobe hanging rail height?
The standard wardrobe hanging rail height for everyday shirts, blouses, and short garments is approximately 40–42 inches (102–107 cm) from the floor. This is a useful starting point for a single short-hanging section, but the final measurement depends on the length of your clothes, the wardrobe’s internal dimensions, and the space available below the rail. Longer garments need a different arrangement to prevent their hems from touching the floor or shelves.
When choosing the height, consider these practical points:
For shirts and blouses: Start with a rail around 40–42 inches high and check the actual hanging length.
For jackets and skirts: Allow additional clearance if the garments are longer or bulkier than your everyday clothing.
For long dresses and coats: Create a dedicated long-hanging section with enough uninterrupted space below the rail.
For accessibility: Make sure frequently worn clothes can be reached comfortably without unnecessary stretching.
Professional tip: Measure your longest garment on its intended hanger before fixing the rail. Standard measurements are helpful, but the clothing you own should determine the final position.
What is the best height for double wardrobe hanging rails?
Double wardrobe hanging rails are designed to store two rows of shorter garments in the space normally used for one hanging section. A common starting arrangement places the lower rail around 38–42 inches (97–107 cm) from the floor and the upper rail around 78–84 inches (198–213 cm). The correct positions depend on the wardrobe’s internal height, garment lengths, and how easily the upper rail can be reached.
Double hanging works particularly well for shirts, blouses, short jackets, and trousers folded over hangers. It is less suitable for long dresses and full-length coats, which require more vertical clearance.
Before installing a double-rail system, consider the following:
Measure the longest garments that will hang from each rail.
Check that clothing on the upper rail won’t overlap the lower hanging section.
Leave enough room to lift hangers onto and off both rails.
Keep frequently used garments within comfortable reach.
Confirm that the rail brackets and wardrobe panels can support the expected weight.
Expert advice: Don’t install the upper rail as high as possible simply to increase storage capacity. Test the proposed height with an actual hanger first. A slightly lower rail that is easy to use is often more practical than an inaccessible rail that looks efficient on paper.
How high should a wardrobe rail be for long dresses and coats?
Long dresses and coats need more vertical clearance than shirts and short jackets. A rail around 60–66 inches (152–168 cm) may work for many long dresses, while a position around 62–68 inches (157–173 cm) can suit some long coats. These are starting ranges rather than universal measurements because formal gowns and full-length outerwear can be considerably longer.
The most reliable method is to hang the garment on the hanger you intend to use and measure from the top of the hook to its lowest point. This gives you the actual hanging length and helps you determine whether the wardrobe has sufficient space.
For a practical long-hanging section:
Measure the longest dress or coat you plan to store.
Allow additional clearance beneath the hem so it doesn’t touch the floor.
Check for drawers, shoe racks, or shelves that may reduce usable space.
Consider a separate long-hanging section instead of raising every rail.
Make sure the rail remains accessible to the person using the wardrobe.
Professional tip: If you own both short clothing and long dresses, divide the wardrobe into separate hanging zones. This prevents you from wasting vertical space on shirts while ensuring longer garments remain properly supported.
How much clearance should there be between a wardrobe hanging rail and the shelf below it?
The clearance between a wardrobe hanging rail and the shelf below it should accommodate the full hanging length of the garment, plus enough room to keep the hem from resting against the shelf. The exact requirement depends on the hanger, clothing length, and whether the garment hangs above a shelf, drawer unit, or the wardrobe floor.
For example, if a shirt measures 29 inches from the hanger hook to the hem, allowing approximately 2–4 additional inches can provide a useful starting point for planning. You should then check the resulting space against the actual wardrobe layout.
To get the clearance right:
Measure the garment while it is hanging on its intended hanger.
Add a practical allowance beneath the hem.
Measure from the top of the shelf or drawer unit, not automatically from the floor.
Check that drawers can open without catching the clothing.
Test whether the hanger can be removed easily from the rail.
Common mistake: Measuring only the distance between the rail and the shelf without considering the garment itself. Even a correctly installed rail can become inconvenient when clothes brush against drawers or become trapped behind stored items.
How do you measure and install a wardrobe hanging rail at the correct height?
To install a wardrobe hanging rail correctly, measure the wardrobe’s internal dimensions, determine the hanging length of your clothing, calculate the required clearance, and test the proposed position before drilling. This approach helps you avoid unnecessary holes, poor spacing, and rails that are difficult to reach.
Follow these steps for a more accurate installation:
Measure the wardrobe: Record the internal height, width, and depth, including any raised base or fixed shelf.
Measure your clothes: Use the longest garment in the section and measure it from the hanger hook to the hem.
Calculate the clearance: Include enough room below the garment and check the space above the rail for hanger movement.
Mark the position: Use a tape measure and a removable mark to indicate the proposed rail height.
Test the arrangement: Hold an actual hanger in position and confirm that the garment clears the shelf, drawer, or floor.
Install the hardware: Follow the manufacturer’s instructions and use brackets and fixings suitable for the wardrobe material.
Check the finished rail: Test it with several garments and inspect for movement or sagging before loading it fully.
Keep these final considerations in mind:
Use a consistent reference point for all measurements.
Check the manufacturer’s rail load rating and bracket-spacing guidance.
Avoid placing the rail where doors, drawers, or other fittings interfere with clothing.
Consider an adjustable rail if your storage requirements may change.
Expert advice: Plan the rail, shelves, and drawers together rather than treating each component separately. A coordinated layout makes better use of the wardrobe’s height and helps keep everyday clothing accessible, organized, and easy to maintain.
Conclusion
Choosing the right wardrobe hanging rail height is an important part of creating a wardrobe that is practical, comfortable, and well organized. The ideal height depends on the clothes you store, the wardrobe’s internal dimensions, the available hanging space, and the people who use it. While a rail positioned around 40–42 inches from the floor works well for many everyday garments, longer dresses, coats, and double-hanging arrangements require different measurements.
Before installing a rail, measure your longest garments, account for hanger and hem clearance, and consider how shelves, drawers, and wardrobe doors will affect everyday access. In smaller bedrooms, thoughtful vertical planning can help maximize storage without making the room feel crowded. Adjustable rails are also worth considering if your clothing collection or storage needs may change over time.
A well-planned wardrobe is not simply about fitting in more clothes; it is about making everything easier to reach, maintain, and organize. By taking accurate measurements and planning each storage zone before installation, you can create a wardrobe that uses available space efficiently and supports a more functional home. Explore more practical storage and home improvement ideas at DesignMode24 Interior Design to help make your living spaces more organized and comfortable.