
Introduction
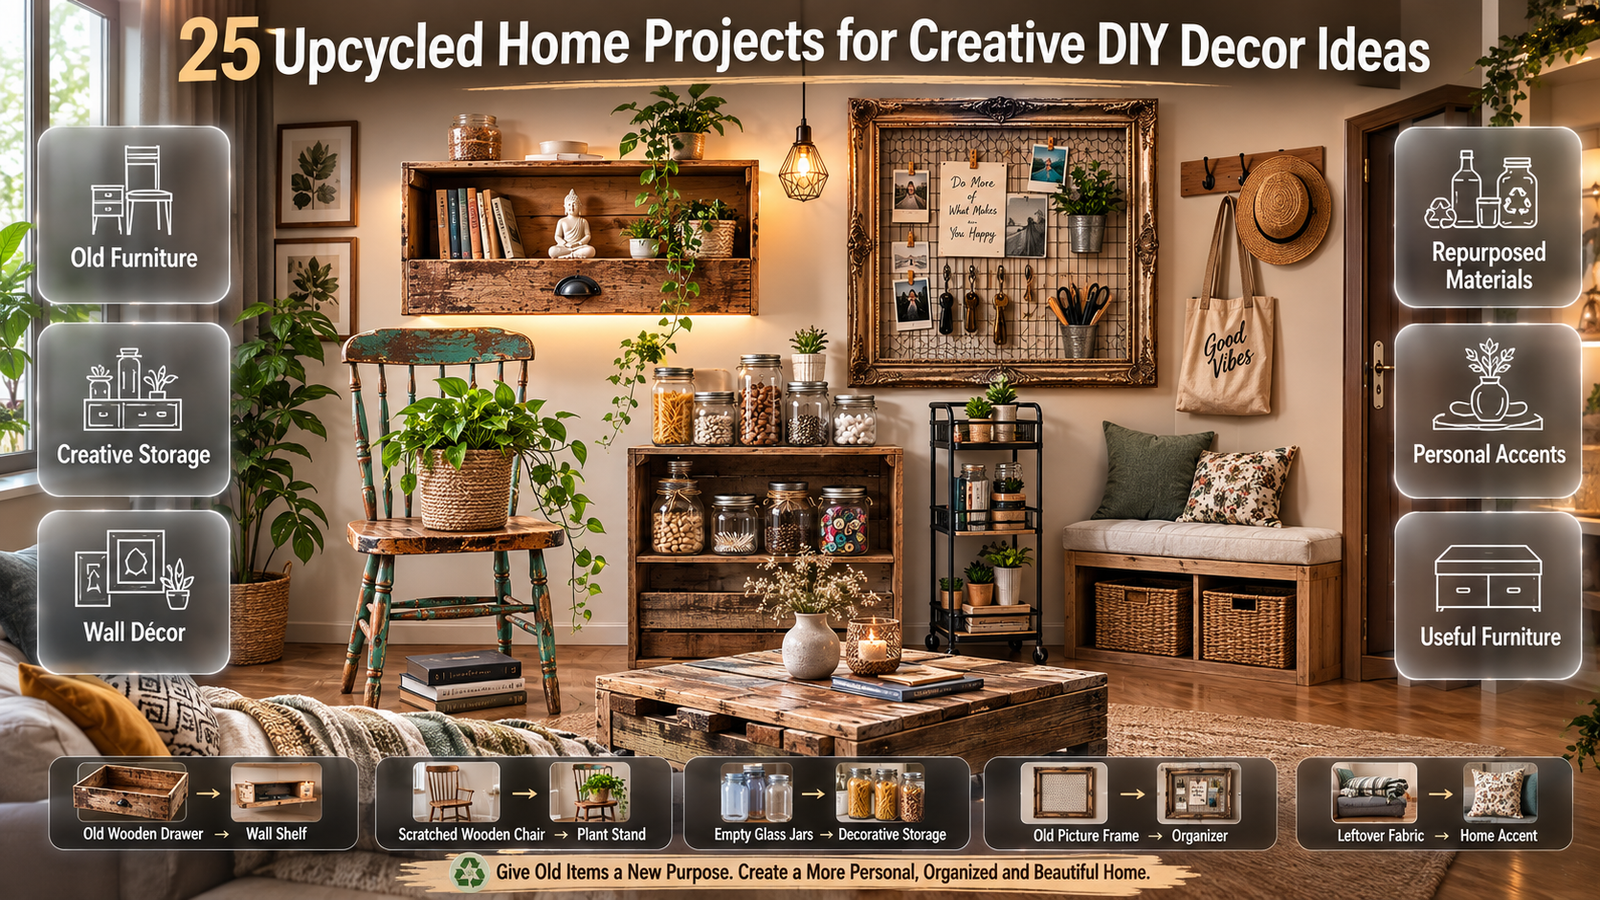
Upcycled Home Projects | An old drawer sitting in the garage, a scratched wooden chair in the corner, or a pile of empty glass jars can easily look like clutter. But before you throw those items away, consider what they could become. With the right idea and a little preparation, ordinary household objects can turn into useful furniture, attractive storage, wall décor, and personal accents.
Upcycled home projects are becoming a practical way to refresh a home without replacing everything. Instead of buying another mass-produced piece, you can transform something you already own into an item that suits your room, budget, and personality.
If you’re planning a broader home refresh, DesignMode24 Interior Design offers additional inspiration for creating a more intentional and personalized space.
The best part is that upcycling doesn’t require every project to be complicated. A simple drawer can become a shelf. An old frame can become an organizer. A damaged chair can become a plant stand. Even leftover fabric can become useful décor.
This guide covers 25 practical upcycled home projects, from easy beginner ideas to more ambitious furniture transformations. You’ll learn what materials are worth saving, how to prepare old items, which projects make sense for different rooms, how to make upcycled pieces look polished, and which mistakes can turn an inexpensive project into wasted time and money.
What Are Upcycled Home Projects?
Upcycled home projects transform an existing unwanted, outdated, damaged, or unused object into something with a new purpose or improved appearance. Instead of breaking the material down, upcycling generally preserves the original item and creatively extends its useful life.
For example, an old wooden ladder can become a blanket rack, while a discarded drawer can become wall storage. A vintage suitcase might become a side table, and an old picture frame can be turned into a jewelry organizer.
The important distinction is that upcycling adds value to an existing object. You’re not simply reusing something in exactly the same way. You’re changing its purpose, appearance, function, or all three.
Why Are Upcycled Home Projects So Popular?
Upcycling appeals to homeowners because it combines creativity with practical benefits.
A successful project can:
- Reduce household waste
- Save money on décor
- Extend the life of furniture
- Create custom storage
- Add personality to a room
- Make use of leftover materials
- Provide a creative weekend project
- Produce one-of-a-kind décor
There’s also a design advantage. Store-bought furniture is often made to appeal to a broad audience, while an upcycled piece can be designed specifically for your room.
You control the color, finish, dimensions, hardware, texture, and styling.
💡 Pro Tip: Before shopping for materials, walk through your home and identify items you already own but no longer use. Upcycling works best when you start with a useful object rather than buying new materials simply to make something look old.
What Is the Difference Between Upcycling and Recycling?
Although the terms are often used together, upcycling and recycling are different processes.
Upcycling keeps an existing item or material largely intact and gives it a new or improved purpose. Recycling usually involves processing waste materials so they can be turned into new raw materials or products.
| Upcycling | Recycling |
|---|---|
| Keeps much of the original object | Processes materials into new raw material |
| Focuses on creative reuse | Focuses on material recovery |
| Often completed at home | Often requires industrial processing |
| Produces a unique finished item | Produces reusable material |
| Can preserve original character | Usually changes the original form |
For home decorating, upcycling is particularly appealing because you can immediately see the transformation.
What Items Are Best for Upcycling?
The best items have three qualities: they are structurally usable, easy enough to modify, and suitable for a practical new purpose.
Good candidates include:
- Wooden drawers
- Old chairs
- Small tables
- Wooden crates
- Picture frames
- Glass jars
- Baskets
- Ladders
- Suitcases
- Cabinet doors
- Old shelves
- Fabric scraps
- Metal containers
- Unused trays
- Wooden boxes
- Vintage furniture
The condition matters more than age.
A scratched but sturdy table can be an excellent project. A beautiful-looking piece with severe structural damage may not be worth restoring.
How Do You Know if an Old Item Is Worth Upcycling?
Ask yourself five questions before starting:
- Is the item structurally sound?
- Can the damage be repaired safely?
- Will I actually use the finished product?
- Is the transformation affordable?
- Does its size work in my home?
If most answers are yes, you’ve probably found a worthwhile project.
⚠ Common Mistake: Don’t keep an object simply because it was free. Free furniture can become expensive when it requires extensive repairs, specialist tools, replacement parts, and hours of work.
25 Best Upcycled Home Projects for Every Room
1. Turn an Old Drawer Into a Wall Shelf
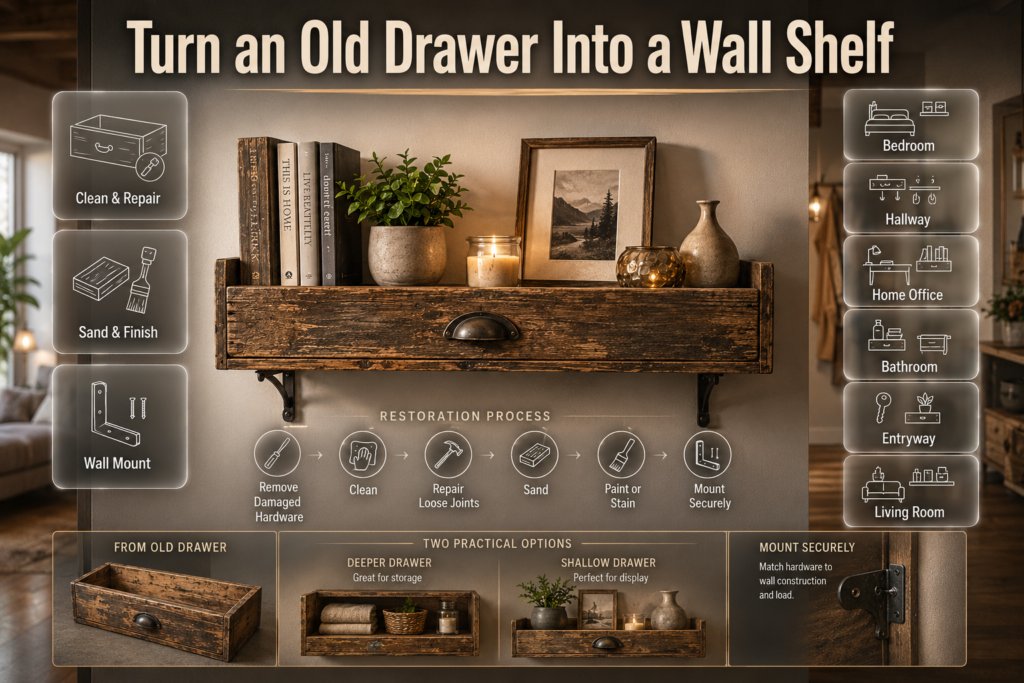
An old drawer is one of the easiest pieces of furniture to transform because its basic structure is already suitable for storage.
Remove damaged hardware, clean the drawer, and repair any loose joints. Lightly sand the surface before painting or staining it.
Once finished, mount it securely on the wall and use it for books, small plants, candles, framed photographs, or decorative accessories.
A deeper drawer can provide useful storage in an entryway or bedroom, while a shallow drawer works well as a decorative display shelf.
You can combine this project with Floating Shelf Ideas for additional ways to create attractive wall storage.
Best Places to Use It
- Bedroom
- Hallway
- Home office
- Bathroom
- Entryway
- Living room
The key is to make sure the wall hardware matches both the wall construction and the expected load.
2. Repurpose Wooden Crates as Storage
Wooden crates are practically designed for upcycling.
Stack several crates vertically to create open storage, or mount individual crates to a wall. You can leave the wood natural for a rustic appearance or paint it to coordinate with your room.
Crates can store:
- Books
- Toys
- Shoes
- Towels
- Plants
- Kitchen supplies
- Decorative objects
For a more polished appearance, keep the arrangement symmetrical and use matching finishes.
For a relaxed room, an intentionally varied arrangement can create more character.
3. Transform an Old Chair Into a Plant Stand
A chair with a damaged seat doesn’t necessarily need to go to waste.
If the frame remains stable, remove the unusable seat and create a platform for a planter. You can repaint the chair or simply clean and protect the existing wood.
This works especially well with vintage wooden chairs because the legs and backrest can create visual interest around plants.
Before using the finished piece, confirm that the planter is stable and that water won’t damage the furniture or floor.
⭐ Expert Tip: Use a plant pot with its own drainage system rather than allowing excess water to sit directly on an upcycled wooden surface.
4. Give an Old Picture Frame a New Function
An outdated picture frame can become much more than wall art.
Remove the old artwork and glass if necessary, then use the frame around:
- Corkboard
- Wire mesh
- Fabric
- Pegboard
- A magnetic surface
- Small hooks
The result can become a jewelry organizer, family message board, entryway organizer, or decorative display.
The frame already provides a finished border, which makes the project look more intentional with relatively little work.
If you’re interested in more creative wall treatments, see DIY Wall Art for related inspiration.
5. Turn Glass Jars Into Organized Storage
Glass jars are inexpensive-looking until they’re cleaned and styled consistently.
Remove labels and adhesive residue, wash the jars thoroughly, and decide what they will hold.
They work well for:
- Cotton pads
- Small craft supplies
- Buttons
- Kitchen ingredients
- Bathroom accessories
- Office supplies
- Small tools
Use matching labels if you’re creating several jars for one room.
A group of identical containers usually looks more sophisticated than a collection of completely unrelated ones.
6. Create a Ladder Blanket Rack
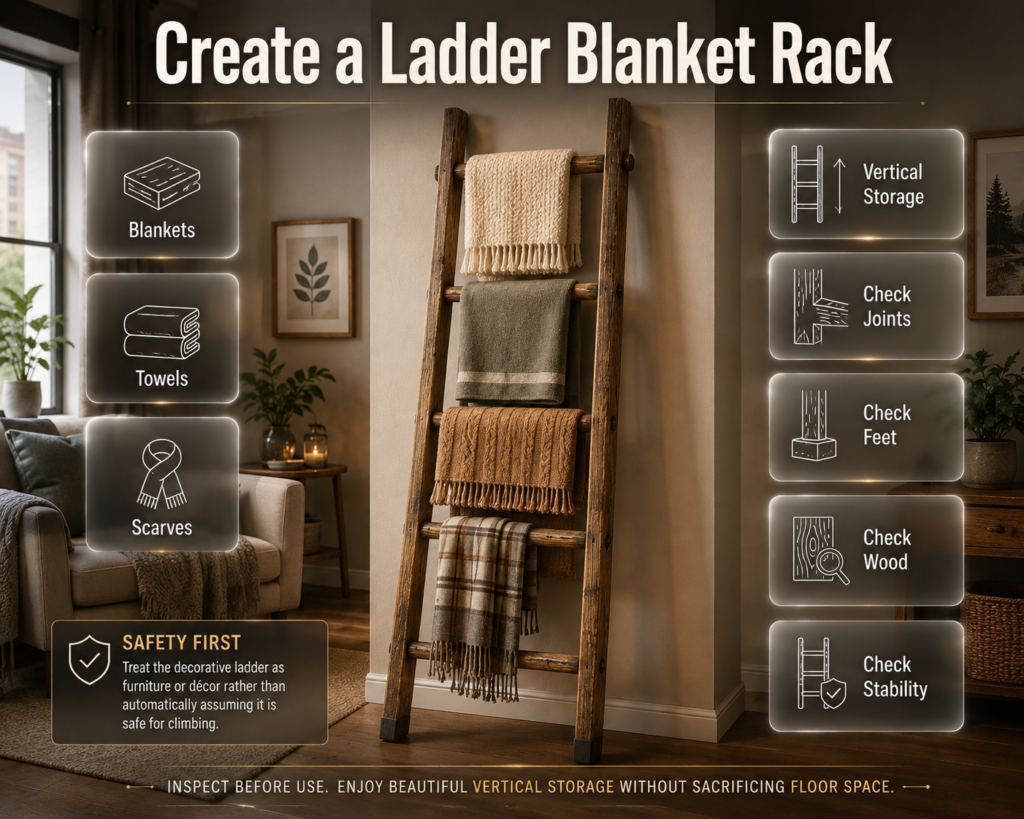
An old wooden ladder can become a useful vertical storage feature.
Lean it securely against a suitable wall and use the rungs to display folded blankets, towels, scarves, or lightweight textiles.
This is especially useful when floor space is limited.
However, decorative ladder projects should be treated as furniture or décor rather than automatically assuming they’re safe for climbing.
Check the joints, feet, wood condition, and stability before using one in your home.
7. Transform an Old Suitcase Into a Side Table
Vintage suitcases can add personality to a room while providing hidden storage.
A sturdy hard-sided suitcase can be mounted on suitable legs or placed on a stable base to create a side table.
Inside, it can hold:
- Books
- Blankets
- Remote controls
- Seasonal accessories
- Personal items
The finished piece works particularly well in eclectic, vintage, and relaxed interiors.
Don’t use a fragile suitcase as seating or as a heavy-load table unless its construction has been properly reinforced.
8. Make a Reclaimed Wood Entryway Organizer
Small pieces of leftover wood can become a practical entryway organizer.
Create a simple board with hooks for keys, bags, hats, or lightweight accessories.
The design can remain rustic or receive a more refined finish.
If you want a coordinated room rather than an isolated project, consider how the organizer’s wood, hardware, and color relate to the rest of your entryway.
9. Repurpose Cabinet Doors Into Wall Décor
Old cabinet doors can be surprisingly versatile.
A solid wood door can become:
- A message board
- A framed display
- A wall organizer
- A decorative panel
- A small tabletop
- A backdrop for hooks
Because cabinet doors often have interesting profiles and details, they can add architectural character to otherwise plain walls.
Before modifying one, remove all unnecessary hardware and inspect the material for damage.
10. Turn an Old Tray Into Wall Art
A wooden serving tray doesn’t have to remain on the dining table.
A tray can become a framed wall display, small shelf, decorative backdrop, or organizer.
Paint the interior a contrasting color, add a simple pattern, or preserve its natural finish.
The raised edges are useful because they help contain small objects.
11. Create a Fabric-Covered Notice Board
Old fabric can be given a second life as a practical notice board.
Use a suitable rigid backing material and cover it with clean, durable fabric. Secure the material neatly on the back.
The finished board can hold:
- Notes
- Photographs
- To-do lists
- Inspiration images
- Important reminders
Choose fabric that works with your existing room rather than selecting a pattern simply because it’s available.
12. Repurpose an Old Cabinet as Bathroom Storage
A small cabinet can often be more useful in a bathroom than it was in its original location.
Before using it, make sure the material and finish can handle the room’s moisture levels. Repair damaged areas and use an appropriate protective finish.
It can hold:
- Towels
- Toiletries
- Cleaning supplies
- Extra tissue
- Small baskets
This project can be particularly useful in bathrooms that lack built-in storage.
13. Create an Upcycled Plant Display
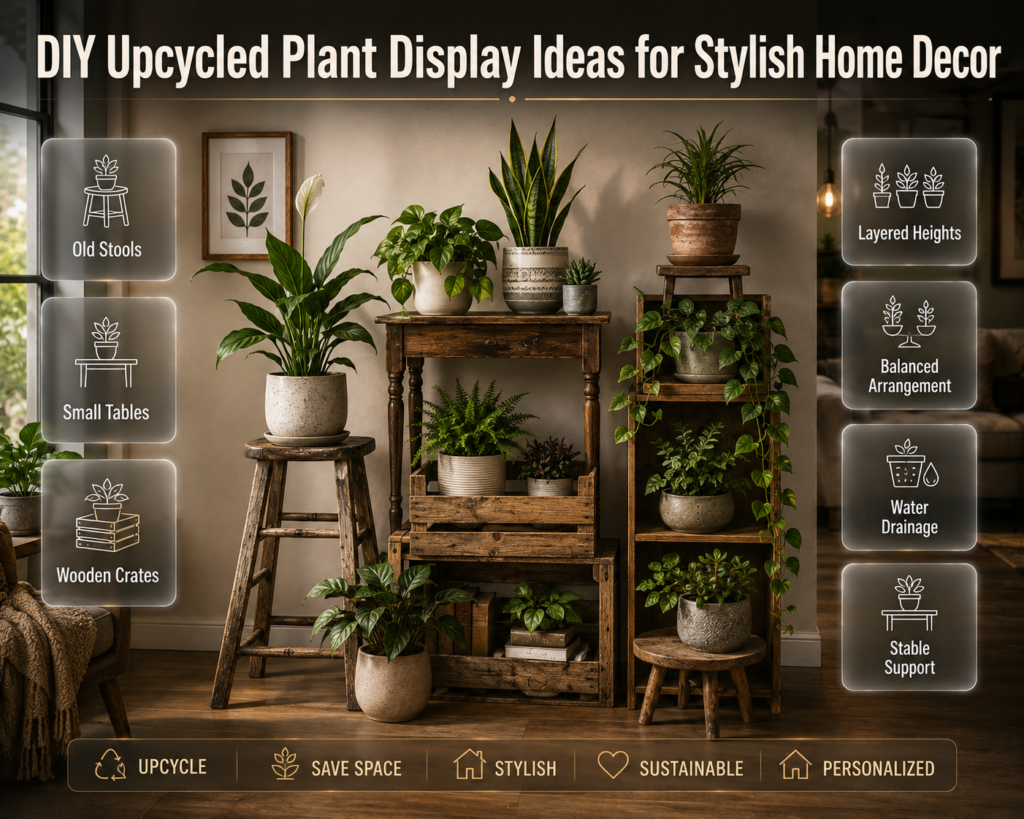
Instead of buying a new plant stand, look for objects that already provide multiple levels.
Old stools, small tables, wooden crates, shelves, and suitable furniture pieces can create a layered plant display.
Vary the plant heights while keeping the overall arrangement balanced.
Make sure water drainage is controlled and that the furniture can safely support the combined weight of the pots.
14. Turn an Old Basket Into Decorative Storage
A worn basket can often be refreshed without completely changing it.
Clean it thoroughly, repair loose sections, and add a simple fabric liner if appropriate.
Use it for:
- Blankets
- Toys
- Magazines
- Towels
- Laundry
- Accessories
Natural baskets work particularly well with warm, neutral, and nature-inspired interiors.
15. Make a Jewelry Organizer From an Old Frame
A large picture frame can become an attractive jewelry organizer with a few simple modifications.
Add hooks, wire, a mesh panel, or small knobs inside the frame.
The jewelry becomes part of the display rather than something hidden in a drawer.
Place the organizer somewhere dry and accessible, such as a bedroom dressing area.
16. Repurpose an Old Window Frame
Old window frames can make excellent decorative features.
Depending on their condition, they can become:
- Photo displays
- Wall décor
- Decorative room dividers
- Message boards
- Seasonal displays
If the original glass is damaged, remove it safely and replace the interior with another suitable material.
Old window frames can work especially well in farmhouse, vintage, rustic, and eclectic spaces.
17. Turn Wooden Offcuts Into Small Shelves
Small leftover wood pieces often get thrown away because they’re too short for large furniture projects.
But short boards can become compact shelves.
They work well above:
- Desks
- Nightstands
- Bathroom sinks
- Entryway tables
- Kitchen counters
This is a great project when you want useful storage without committing to a large construction project.
18. Transform an Old Table Into a New Accent Piece
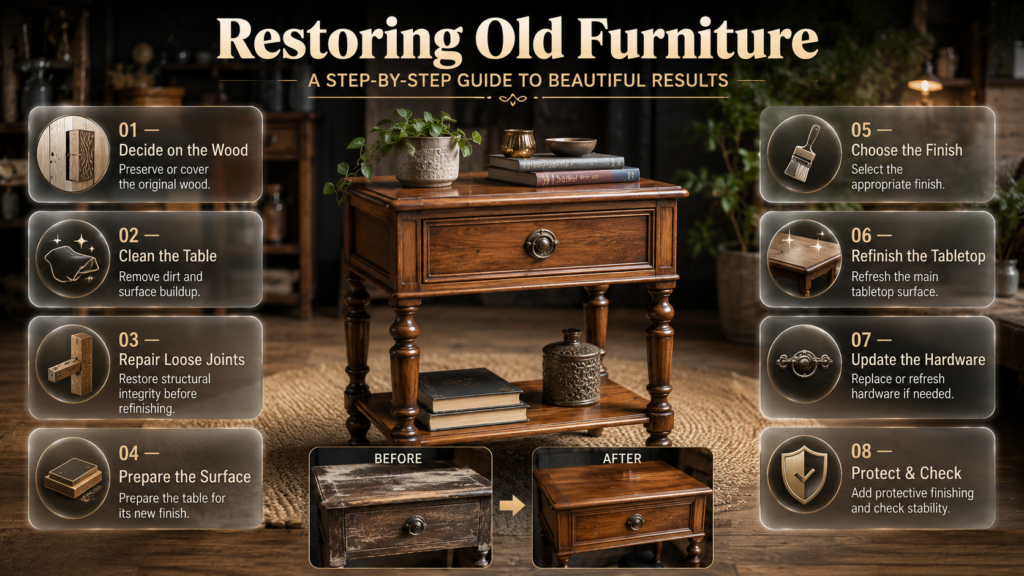
An outdated side table can often look completely different after a careful makeover.
Start by deciding whether the original wood should be preserved or covered.
Then:
- Clean the table.
- Repair loose joints.
- Prepare the surface.
- Choose the finish.
- Refinish the tabletop.
- Update the hardware if needed.
- Add protective finishing.
- Check stability.
For additional furniture transformation ideas, explore Furniture Makeovers.
19. Turn an Old Door Into a Headboard
An old wooden door can become a dramatic bedroom feature.
The door should be structurally sound, properly cleaned, and safely prepared before installation.
You can preserve its natural character, paint it, or use a finish that works with your bedroom.
The size of the door matters. Measure the bed and wall before cutting or installing anything.
This project is best for intermediate or experienced DIYers because the finished piece can be heavy.
20. Make a Repurposed Storage Bench
A strong wooden chest, cabinet, or suitable low piece of furniture can sometimes become a bench.
However, seating requires much more attention to structural strength than decorative furniture.
The base must safely support the expected load, and all joints should be secure.
Add a properly fitted cushion only after confirming that the structure is strong enough.
21. Turn Old Books Into Decorative Displays
Books that are no longer useful for reading can sometimes become decorative elements, provided you don’t damage valuable or important editions.
They can be used as risers for décor, layered displays, or styling elements.
Keep the arrangement simple. Too many stacked objects can look cluttered and may create instability.
22. Repurpose Metal Containers
Clean metal containers can become small storage units, planters, pencil holders, or decorative organizers.
Before using them, remove sharp edges and ensure the container is appropriate for the intended purpose.
For food-related uses, only use containers that are suitable for food contact and can be cleaned properly.
23. Create a Repurposed Candle Display
Small glass containers, old trays, and suitable decorative vessels can become candle displays.
Keep heat and fire safety in mind.
Use heat-resistant surfaces and appropriate candle holders. Never place an open flame near curtains, paper, fabric, or unstable materials.
For a safer alternative, battery-operated candles can provide a similar visual effect without an open flame.
24. Turn Leftover Wood Into a Gallery Display
A collection of small wood pieces can become a coordinated wall display.
Use similar finishes or a common color palette so the pieces feel connected.
You can create small shelves, frames, geometric panels, or decorative blocks.
The goal is to make the collection look intentional rather than like leftover construction material.
25. Build a Complete Upcycled Corner
Instead of making one isolated project, create a small coordinated area.
For example:
Old table → refinished side table
Old frame → wall organizer
Wooden crate → storage
Glass jar → decorative container
When the pieces share a color palette and material language, they can look like a deliberately designed interior.
For broader inspiration, Home Design Ideas can help you think about how individual DIY pieces fit into a complete room.
How Do You Start an Upcycling Project Step by Step?
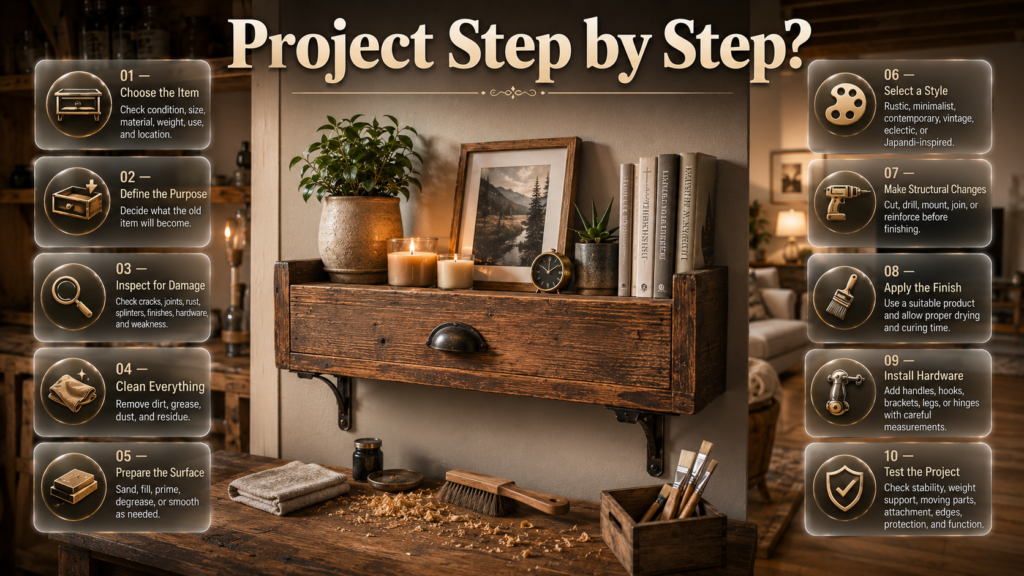
The biggest difference between a successful project and a frustrating one is usually preparation.
Step 1: Choose the Item
Don’t choose an object simply because it looks interesting.
Consider its:
- Condition
- Size
- Material
- Weight
- Intended use
- Location
A small project is usually better for your first attempt.
Step 2: Define the New Purpose
Write down one simple sentence:
“This old item will become ______.”
For example:
“This old drawer will become a wall shelf.”
This prevents unnecessary modifications.
Step 3: Inspect for Damage
Look for:
- Cracks
- Loose joints
- Rust
- Splinters
- Peeling finishes
- Missing hardware
- Water damage
- Structural weakness
Fix structural issues before cosmetic ones.
Step 4: Clean Everything
Cleaning removes dirt, grease, dust, and residue that can interfere with finishes.
Use a cleaning method suitable for the material.
Don’t soak materials that can swell or become damaged by excess water.
Step 5: Prepare the Surface
Depending on the project, preparation might include:
- Sanding
- Filling
- Priming
- Degreasing
- Removing loose paint
- Smoothing rough edges
You don’t always need to strip an item completely.
The goal is to create a stable surface suitable for the new finish.
Step 6: Select a Design Direction
Choose the visual style before painting.
Would the item work better as:
- Rustic?
- Minimalist?
- Contemporary?
- Vintage?
- Eclectic?
- Japandi-inspired?
Your finish should support the room rather than fight it.
For more guidance on design direction, explore Interior Design Styles.
Step 7: Complete Structural Changes
Cutting, drilling, mounting, joining, or reinforcing should happen before the final decorative finish whenever possible.
This reduces the chance of damaging the finished surface.
Step 8: Apply the Finish
Use an appropriate product for the material and intended use.
Allow adequate drying and curing time according to the manufacturer’s instructions.
Don’t rush this stage simply because the project looks almost finished.
Step 9: Install Hardware
Handles, hooks, brackets, legs, and hinges can dramatically affect the finished appearance.
Measure carefully before drilling.
Step 10: Test the Finished Project
Before regular use, check:
- Stability
- Weight support
- Moving parts
- Wall attachment
- Sharp edges
- Surface protection
- Overall functionality
A project isn’t finished when it looks good. It’s finished when it works safely.
What Finishes Work Best for Upcycled Furniture?
The best finish depends on the material and how the item will be used.
| Finish | Best For | Appearance |
| Paint | Furniture and décor | Solid color |
| Wood stain | Suitable natural wood | Shows grain |
| Clear protective finish | Wood | Natural/protected |
| Oil finish | Certain wood projects | Natural and subtle |
| Decorative paint | Accent pieces | Artistic |
| Fabric covering | Upholstery projects | Soft/textured |
Color also changes how an upcycled item fits into the room.
For broader inspiration, explore Paint Color when choosing a palette.
A useful rule is to match the project to the room’s existing visual language rather than treating it as an isolated craft.
How Do You Make Upcycled Furniture Look Expensive?
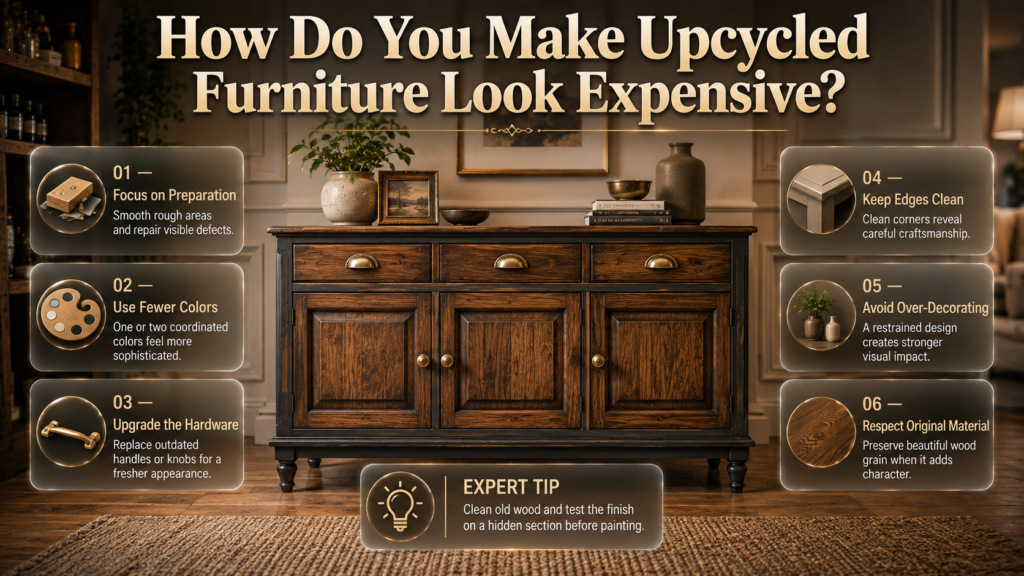
You don’t need expensive materials to create an expensive-looking result.
You need precision.
Focus on Preparation
Smooth rough areas and repair visible defects before applying the finish.
Use Fewer Colors
One or two coordinated colors often look more sophisticated than multiple unrelated shades.
Upgrade the Hardware
Changing outdated handles or knobs can make an old cabinet look substantially newer.
Keep Edges Clean
Messy corners immediately reveal a rushed DIY project.
Avoid Over-Decorating
A clean, restrained design often has more visual impact.
Respect the Original Material
If an old piece has beautiful wood grain, don’t automatically cover it with paint.
Sometimes the best upcycling decision is simply restoring what’s already there.
⭐ Expert Tip: Before painting old wood, clean it and test a small hidden section with your intended finish. You may find that the original material has more character than you expected.
Which Interior Styles Work Best With Upcycled Décor?
Upcycled pieces don’t belong to one specific decorating style.
Minimalist Interior Design
Minimalist rooms benefit from carefully selected pieces rather than lots of small projects.
Choose one or two strong upcycled elements and keep their finishes simple.
For additional inspiration, see Minimalist Interior Design.
Contemporary Interior Design
Contemporary rooms can benefit from contrast.
Pair an older wooden object with a clean finish, modern hardware, or a simple geometric form.
Explore Contemporary Interior Design for more ideas.
Japandi-Inspired Spaces
Japandi-inspired interiors work particularly well with natural wood, neutral tones, simple shapes, and visible craftsmanship.
An old wooden stool with a subtle finish may fit this aesthetic better than a heavily decorated project.
For more direction, visit Japandi Interior Design.
Rustic Interiors
Rustic spaces naturally accommodate reclaimed wood, vintage furniture, baskets, crates, and weathered finishes.
The challenge is preventing the room from becoming visually overloaded.
Eclectic Interiors
Eclectic rooms give you more freedom to combine different periods and materials.
Even here, use a connecting element such as color, texture, shape, or finish.
What Are the Most Common Upcycling Mistakes?
Mistake 1: Starting Without a Purpose
Many beginners start painting before deciding what the object will become.
That often creates unnecessary work.
Better approach: Decide the final use first.
Mistake 2: Ignoring Structural Damage
A fresh coat of paint can hide cosmetic problems but can’t make an unstable piece safe.
Better approach: Repair joints and structural components before decorating.
Mistake 3: Poor Surface Preparation
Paint applied over dirt, grease, loose coatings, or unsuitable surfaces can peel and fail.
Better approach: Clean and prepare according to the material and chosen finish.
Mistake 4: Using Too Many Decorative Elements
Adding rope, labels, distressing, multiple colors, and decorative hardware doesn’t automatically improve the project.
Better approach: Choose one clear design direction.
Mistake 5: Forgetting Scale
A huge upcycled cabinet can overwhelm a small room.
A tiny shelf may disappear on a large wall.
Better approach: Measure before modifying.
Mistake 6: Choosing Appearance Over Function
A beautiful storage unit that can’t hold anything useful isn’t a successful project.
Better approach: Test the finished item for its actual intended purpose.
Mistake 7: Buying Too Many Supplies
It is easy to spend more on a DIY project than the original item was worth.
Better approach: Make a materials list before shopping.
Mistake 8: Rushing the Finish
Paint may feel dry but still need additional curing time.
Better approach: Follow the product instructions and allow adequate time before heavy use.
Mistake 9: Poor Wall Installation
Wall-mounted upcycled furniture can become dangerous if attached incorrectly.
Better approach: Use appropriate anchors or secure the piece to suitable structural support.
Mistake 10: Upcycling Everything
A home should not become a storage warehouse for future projects.
Better approach: Choose projects selectively and let unused materials go.
How Can You Make Upcycling More Sustainable?
The most sustainable project isn’t necessarily the one that uses the most recycled materials.
It is usually the one that extends an item’s useful life without creating unnecessary consumption.
For example, if you already own an old wooden table, repairing and refinishing it can make sense.
Buying a new table just to cut it apart for an upcycling project doesn’t provide the same benefit.
Think about the complete lifecycle:
Existing item → repair → transformation → long-term use
The longer the finished product remains useful, the more meaningful the upcycling effort becomes.
You can also reduce waste by planning your materials carefully and using leftover paint, hardware, and wood where practical.
For readers interested in environmentally conscious home improvements, Energy-Efficient Homes offers a broader perspective on improving a home beyond décor.
How Do You Decide Whether to Upcycle or Buy New?
Upcycling isn’t always the right answer.
| Situation | Recommended Choice |
| Item is sturdy and repairable | Upcycle |
| Item has sentimental value | Upcycle |
| Simple cosmetic damage | Upcycle |
| You need unusual dimensions | Upcycle |
| Structural damage is severe | Consider replacing |
| Restoration costs are very high | Compare with new |
| Safety-critical use | Prioritize an appropriate new product |
| You don’t have time for the project | Buy or professionally restore |
The best decision considers cost, time, safety, usefulness, and personal value.
How Can Upcycled Pieces Fit Into a Complete Home?
One of the biggest mistakes is treating every DIY project as an independent object.
Instead, think about how the project interacts with your entire room.
Consider:
- Wall color
- Flooring
- Furniture scale
- Wood tones
- Metal finishes
- Lighting
- Textures
- Storage needs
- Existing décor
For example, if your room already has warm wood furniture, a natural wood upcycled shelf may fit better than a brightly painted piece.
If your room is minimalist, one carefully restored cabinet may be enough.
If your space is eclectic, several different upcycled pieces can work as long as there is some visual connection.
For a broader approach to home styling, Home Styling can help you think about placement, balance, and accessories.
When Should You Use DIY Home Projects Instead of Buying Décor?
DIY becomes particularly useful when:
- You need a custom size
- You want a specific color
- You have an unusual space
- You want to preserve a sentimental object
- You want to reduce unnecessary purchases
- You enjoy hands-on work
- You need a unique design feature
For a larger collection of DIY ideas, explore DIY Home Projects.
The important thing is to choose projects based on real needs rather than creating objects simply because a DIY tutorial makes them look easy.
What Tools Do You Need for Basic Upcycling?
You don’t need a professional workshop to begin.
A basic toolkit may include:
- Screwdrivers
- Measuring tape
- Sandpaper
- Utility knife
- Pliers
- Clamps
- Paint brushes
- Small roller
- Protective gloves
- Cleaning cloths
- Suitable drill
- Appropriate wall anchors
More advanced furniture projects may require additional equipment.
Buy tools gradually as your projects become more ambitious.
A good rule is to invest in tools that you’ll use repeatedly rather than buying specialist equipment for a single project.
How Can You Plan a Weekend Upcycling Project?
If you only have a weekend, choose a project that doesn’t require major structural changes.
Friday or Planning Stage
Choose the object, decide its purpose, measure it, and gather materials.
Saturday
Clean, repair, sand, and prepare the piece.
Complete the first finishing stage if appropriate.
Sunday
Finish painting or staining, install hardware, allow proper drying or curing time, and test the final piece.
Don’t force the schedule if the product requires longer curing.
A project that takes an extra day but produces a durable result is better than one rushed to meet an arbitrary deadline.
10 Quick Upcycling Ideas When You Don’t Want a Big Project
Not every transformation needs an entire weekend.
Try:
- Paint an old wooden tray.
- Turn a jar into a small organizer.
- Refinish a picture frame.
- Add new hardware to an old cabinet.
- Convert a small crate into storage.
- Create a simple fabric notice board.
- Turn a suitable container into a planter.
- Refinish a small stool.
- Transform a drawer into a shelf.
- Create a small decorative display from reclaimed wood.
These smaller projects are excellent for beginners because they let you practice preparation and finishing without taking on a large piece of furniture.
How Do You Avoid Making an Upcycled Room Look Cluttered?
Upcycling can create a beautiful home, but too many projects can produce visual noise.
Use the one-in, one-out principle where practical.
If you’re adding a new storage piece, remove something you no longer need.
Also group related objects.
For example, three matching wooden crates can look intentional. Ten unrelated containers may look chaotic.
Use repetition through:
- Color
- Material
- Shape
- Hardware
- Texture
This creates visual consistency.
If you want your DIY pieces to feel part of a stronger overall concept, explore Interior Design as you plan the room around them.
What are the best upcycled home projects for beginners?
The best beginner projects are the ones that don’t require major structural changes, expensive tools, or advanced woodworking skills. Old drawers, picture frames, wooden crates, small tables, glass jars, trays, stools, and simple chairs are excellent starting points because their original shapes already provide most of the structure you need.
A good first project should let you practice the fundamentals—cleaning, surface preparation, sanding, painting, staining, and installing simple hardware—without making the process unnecessarily complicated. For example, turning an old drawer into a wall shelf is much more manageable for a beginner than converting an entire cabinet into a kitchen island.
Good beginner choices include:
Old drawer → wall shelf
Wooden crate → storage unit
Picture frame → organizer
Glass jar → decorative storage
Old tray → wall display
Small stool → plant stand
Wooden chair → accent piece
The important thing is to choose an item that’s structurally sound but cosmetically tired. Scratches, outdated colors, worn finishes, and old hardware are relatively easy to change. Broken joints, severe water damage, rot, or serious instability are much more difficult and may make the project unsafe.
Professional advice: Start with a project you can realistically finish in a weekend. Completing one clean, useful transformation will teach you more than starting a complicated furniture makeover and leaving it half-finished.
Is upcycling furniture cheaper than buying new furniture?
Upcycling can be cheaper than buying new furniture, but it isn’t automatically the less expensive option. The final cost depends on the condition of the original piece, the materials you already have, the tools required, and how extensive the transformation needs to be.
If you already own a solid wooden table and only need sandpaper, paint, and new hardware, upcycling can be a very economical choice. On the other hand, if an old cabinet needs replacement doors, new hinges, extensive repairs, specialist tools, and several coats of expensive finishing products, the total cost can quickly approach or exceed the price of a new piece.
There’s another value that shouldn’t be overlooked: customization. A secondhand or existing piece can often be modified to fit a particular space, color scheme, or storage requirement. Current interior design trends are also putting more emphasis on longevity, craftsmanship, repairability, and furniture with character rather than disposable, short-lived pieces.
Before starting, calculate:
Cost of paint or stain
Primer and protective finish
New handles or hardware
Replacement parts
Sandpaper and consumables
Tools you need to purchase
Your available time
Expected lifespan of the finished piece
Best rule: If the original furniture is strong, useful, and repairable, upcycling is often worth considering. If the structure is badly compromised and restoration requires extensive spending, compare the complete project cost with a suitable new or secondhand alternative.
How do you make upcycled furniture look expensive and professionally finished?
The secret to making an upcycled piece look expensive isn’t adding more decoration. It’s better preparation, cleaner finishing, and thoughtful design.
A professionally finished piece usually starts with proper cleaning and surface preparation. Remove dirt, grease, loose finishes, and damaged material before applying anything new. Repair loose joints and structural problems first. Then choose a finish that suits both the material and the room.
Hardware can also make a surprisingly large difference. Replacing dated knobs or handles with simple, well-proportioned hardware can completely change the appearance of an old cabinet or dresser.
To achieve a more polished result:
Repair structural problems before decorating.
Clean the surface thoroughly.
Sand or prepare the surface according to the finish you’re using.
Keep paint application even.
Avoid visible brush marks where possible.
Measure hardware carefully.
Keep edges and corners neat.
Choose a limited color palette.
Allow finishes to dry and cure properly.
Don’t overcrowd the finished piece with decorations.
Another important consideration is knowing when not to change something. An old wooden cabinet may have beautiful grain or craftsmanship that would be lost beneath several layers of paint. Current design conversations increasingly value vintage furniture, craftsmanship, personality, and pieces that feel collected rather than mass-produced.
⭐ Expert Tip: Before committing to paint, test your intended finish on a hidden section. Sometimes a good cleaning, light preparation, and suitable protective finish can produce a better result than completely covering the original material.
The goal should be refined transformation, not making an old item look artificially new.
What old household items are best for upcycling?
The best items for upcycling are generally those that have good structure, useful proportions, and materials that can be cleaned or refinished. You don’t need a valuable antique to create something worthwhile. In fact, ordinary household objects can often provide the easiest starting point.
Wooden furniture is particularly versatile because it can be repaired, sanded, painted, stained, modified, or combined with new hardware. Drawers can become shelves, cabinet doors can become wall organizers, and old tables can be redesigned as storage or accent furniture.
Some of the most useful items to save include:
Old Item
Upcycling Possibility
Wooden drawer
Wall shelf or organizer
Old chair
Plant stand or accent piece
Wooden crate
Open storage
Picture frame
Jewelry or wall organizer
Glass jar
Storage or planter
Old ladder
Blanket or towel rack
Suitcase
Side table or storage
Cabinet
Bathroom or entryway storage
Tray
Wall display
Old door
Headboard or decorative panel
Don’t judge an item only by its current appearance. A scratched table with solid construction may have much more potential than a newer but poorly made piece.
The same principle applies when buying secondhand furniture specifically for an upcycling project. Check the joints, material quality, dimensions, and damage before thinking about color or style.
Current design coverage continues to highlight vintage and resale furniture because these pieces can bring character, craftsmanship, and individuality into contemporary homes.
A useful selection rule: Look for cosmetic problems rather than structural problems.
A bad color is easy to change. A loose joint can often be repaired. But extensive rot, severe structural damage, or unsafe construction may make an item unsuitable for a DIY transformation.
Is upcycling home décor actually sustainable?
Upcycling can be a more sustainable approach to decorating because it extends the useful life of an existing item instead of immediately replacing it. Rather than sending a usable chair, table, drawer, or cabinet into the waste stream, you can repair or transform it and keep it in service for longer.
However, sustainability isn’t simply about using something old. A project becomes less meaningful if you buy large quantities of new materials, replace usable components unnecessarily, or create a decorative item that won’t be used for long.
The strongest approach is to think about longevity first.
For example, repairing a sturdy wooden table and using it for another decade is a much stronger long-term decision than repeatedly buying inexpensive furniture and replacing it whenever the style changes.
That focus on durability is increasingly reflected in 2026 interior design discussions. Designers are emphasizing furniture that lasts, can be repaired, and has lasting value rather than treating sustainability as a superficial design label.
Make your upcycling projects more sustainable by:
Reusing materials you already have.
Repairing instead of replacing whenever practical.
Choosing durable finishes.
Avoiding unnecessary decorative materials.
Using leftover paint and hardware where appropriate.
Selecting timeless designs rather than short-lived trends.
Creating pieces you’ll actually use.
Maintaining the finished furniture so it lasts longer.
There’s also a design benefit. Upcycled furniture can give a room a sense of history and personality that is difficult to achieve with identical mass-produced pieces. Designers and home publications are increasingly highlighting vintage objects, personal collections, craftsmanship, and interiors that feel authentic rather than perfectly staged.
The professional takeaway: Don’t upcycle something merely because you can. Upcycle it because the finished piece will be useful, durable, attractive, and worth keeping.
Conclusion
Upcycled home projects offer a different way to think about decorating. Instead of asking what you need to buy, you can start by asking what you already have that could be made useful again.
That old drawer may become a wall shelf. A scratched table may become a fresh accent piece. A forgotten frame may become an organizer. A wooden crate may solve a storage problem. These transformations don’t need to be complicated to make a meaningful difference.
The most successful upcycling projects combine function, thoughtful design, proper preparation, and restraint. They don’t simply disguise an old object. They give it a new reason to exist.
Start with one item that has good bones. Clean it thoroughly, repair what needs repairing, decide on a clear purpose, and choose a finish that fits your room. Don’t rush the process, and don’t add decoration just for the sake of adding it.
If you’re developing a larger home improvement or decorating plan, you can return to DesignMode24 Interior Design for more ideas that can help connect individual DIY projects with the overall look and function of your home.
The goal isn’t to fill your house with handmade objects. It’s to create a home where useful things have character, old materials have another chance, and every transformation feels like it belongs there.
Leave a Reply